COMBINACIONES DE TECLAS WINDOWS 7

HOY OS VOY A EXPLICAR CÓMO INTERACTUAR CON EL ORDENADOR DE UNA FORMA MÁS RÁPIDA.

Muchos usuarios desconocen que Windows 7  posee combinaciones de teclas para hacer más sencillo y rápido el control del equipo. La gran mayoría de informáticos utilizamos Combinaciones de teclas para  interactuar rápidamente con el ordenador.

Para utilizar las combinaciones de teclas tenemos que saber que teclas vamos a utilizar.

Teclas
Win = Tecla Windows.
Shift = Tecla mayúsculas, distinta de bloqueo mayúsculas (Bloq Mayus)
Alt = Tecla Alt(alternativa)
Tab = Tecla Tab(Tabulador)
Ctrl = Tecla Ctrl(Control)
Esc = Tecla Esc(Escape)
Espacio = Tecla Espacio(Barra espaciadora)

Estas son las combinaciones de teclas en Windows 7:

  • Win + E = Muestra el explorador de Windows.
  • Win + D =  Muestra el  escritorio ocultando todas las ventanas.
  • Win + F = Muestra la ventana de búsqueda.
  • Win + G = Muestra los gadgets  y  sin soltar la tecla de Win, vamos pulsando  G y  nos iremos desplazando por los gadgets.
  • Win + L = Bloquea el equipo.
  • Win + M = Minimiza todas las ventanas.
  • Win + Shift + M = Restaura las ventanas a su estado anterior.
  • Win + P = Extiende la pantalla (mínimo dos monitores)
  • Win + R = Muestra la ventana Ejecutar.
  • Win + T = Te sitúa en la barra de inicio, y  sin soltar la tecla de Win, vamos pulsando  Ty nos iremos desplazando por  los ítems de la barra.
  • Win + U =Muestra la ventana Centro de accesibilidad.
  • Win + X = Abre el Centro de movilidad (Solo con portátiles).
  • Win + (+/-) = Aumenta zoom / Disminuye zoom (Lupa).
    Win + F1 = Muestra la ventana de Ayuda y soporte técnico.
  • Win + Pausa = Muestra la ventana de Información del sistema.
  • Win + Tab = Nos muestra todas la aplicaciones que estamos usando en 3D, y  sin soltar la tecla de Win vamos pulsando  TAB, nos iremos desplazando por cada una de las aplicaciones.
  • Win + numero (1-9) = El numero 1 indica que ejecutara el primer icono de nuestra barra de inicio, nos muestra la ventana de ese programa.
  • Win + Shift + numero (1-9) = El numero 1 indica que ejecutara el primer icono de nuestra barra de inicio, en caso de ya estar ejecutado nos inicia una nueva ventana de ese programa.
  • Win + Ctrl + numero (1-9) = No muestra  las ventanas abiertas, donde cada número indica a que icono de nuestra barra de inicio pertenece.
    Win + Alt + numero (1-9) = Muestra la lista de saltos para la aplicación elegida con el número que le indiquemos.
  • Win + Espacio = Todas las ventanas se vuelven transparentes.
  • Win + Esc + flechas = Desplazarse por la barra.
  • Win + flecha izquierda = Desplaza la ventana activa (izquierda, derecha y centro).
  • Win + flecha derecha = Desplaza la ventana activa (izquierda, derecha y centro).
  • Win + flecha arriba = Maximiza la ventana.
  • Win + flecha abajo = Minimiza la ventana.
  • Win + Shift + flecha arriba = Ajusta la ventana verticalmente (maximiza).
  • Win + Shift + flecha abajo = Ajusta la ventana verticalmente (recupera el tamaño).

Impactos: 0

CPU Affinity Shortcut for a Program – Create in Windows

How to Create a Shortcut to Run an Application with a Set CPU Affinity in Windows


Processor affinity or CPU Pinning enables the binding and un-binding of a process or thread to a physical CPU or a range of CPUs, so that the process or thread in question will run only on the CPU or range of CPUs in question, rather than being able to run on any CPU

By default, Windows runs an application on all available cores of the processor. If you have a multi-core processor, then this tutorial will show you how to set the processor affinity of an application to control which core(s) of the processor the application will run on.

If the application and CPU supports Symmetric Multiprocessing (SMP) or HyperThreading (HT), then Windows will automatically adjust the application's usage of each processor core for the best performance. You will not gain much, if anything, from manually changing the processor affinity for these type of applications.

If you have more then one processor intensive applications running, then you could improve their performance by setting the processor affinity of their processes to run on a different core(s). This way they are not competing for the resources of the same core(s).


This tutorial will show you how to create a shortcut that will always run an application with a set CPU affinity by default in XP, Vista, Windows 7, and Windows 8.


Here's How:

1. This step will show you how many CPU cores you have, and how to figure the hex value to use at step 3 below for the CPU(s) you want to run the application on.

NOTE: If you should need any assistance with this step, then please feel free to post. I'll be happy to help.


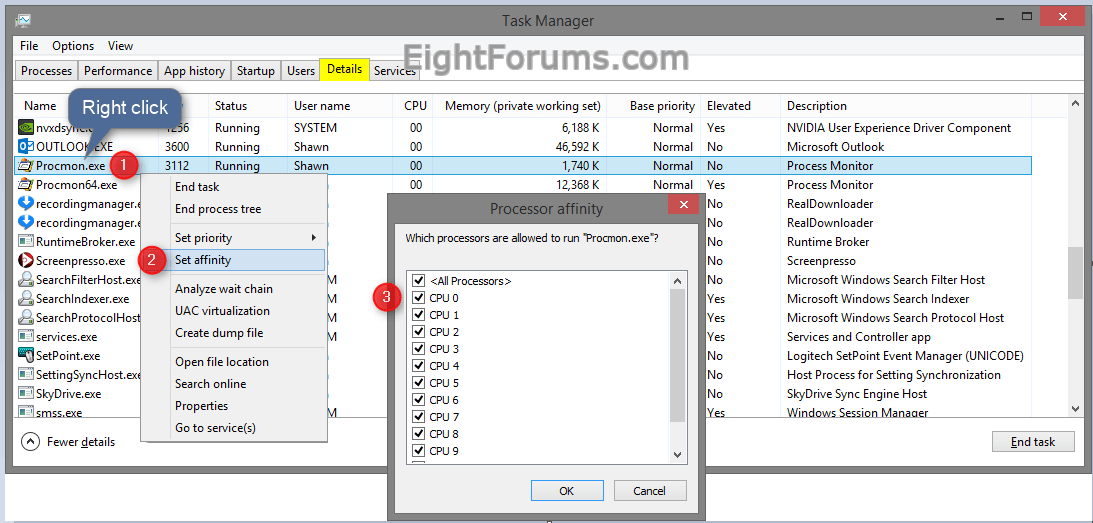
A) Open Task Manager (CTRL+Shift+ESC) in more details view, click/tap on the Processes (XP, Vista, Windows 7) OR Details (Windows 8) tab, right click or press and hold on any process in the Name column, and click/tap on Set affinity. (see screenshot below)

NOTE: This will show you how many CPU cores you have. I have 12 CPU cores numbered from 0 to 11.

Task_Manager_Affinity-all.png


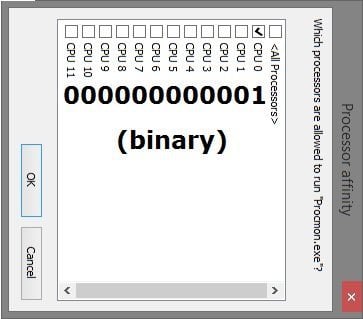
B) For how many CPU cores you have will also be how long the binary number will be. Since I have 12 CPU cores, the binary number will be 12 zeros 000000000000. Each zero in the binary number represents a CPU core number from right to left. In my case with 12 CPU cores, the far right 0 in the binary number will be for CPU 0, and the far left 0 will be for CPU 11. (see screenshot below)

C) For each CPU number you want to run the application on, replace 0 (off) with 1 (on) in the binary number for the CPU numbers.

For example, if I wanted to run the application only on CPU 0, then my binary number would be changed to 000000000001. To run the application on CPU 0 and CPU 3, I would use 000000001001. (see screenshot below)

binary.jpg


D) Go the website below, and type your binary number from step 1C above into the Binary field. This will convert the binary number to a hexadecimal (hex) that you will need to use at step 3 below.

Website: Binary/Decimal/Hexadecimal Converter


For example, with my 000000000001 binary number, I get a hex value of 1. (see screenshot below)

Binary-Decimal-Hexadecimal-Converter.png


2. Right click or press and hold on an empty area of your desktop, and click/tap on New and Shortcut.

3. Type the command below into the location area, and click/tap on the Next button. (see screenshot below)


cmd.exe /c start “Program Name” /affinity # “Full path of application file


For example: I would type this command below exactly if I wanted to create a shortcut to run Process Monitor on only CPU 0 (step 1), and it's .exe file is located at “E:\Programs\Process Monitor 3.05\Procmon.exe“.

(For only on CPU 0)
cmd.exe /c start “Process Monitor” /affinity 1 “E:\Programs\Process Monitor 3.05\Procmon.exe

(For on CPU 0 and CPU 3)
cmd.exe /c start “Process Monitor” /affinity 9 “E:\Programs\Process Monitor 3.05\Procmon.exe


Note   Note
Substitute Program Name in the command with the actual program's name within quotes.

Substitute # in the command for the affinity # with the hex value (ex: 1) from step 1D above.

Substitute Full path of application file in the command with the full path of the file within quotes.


shortcut-1.jpg

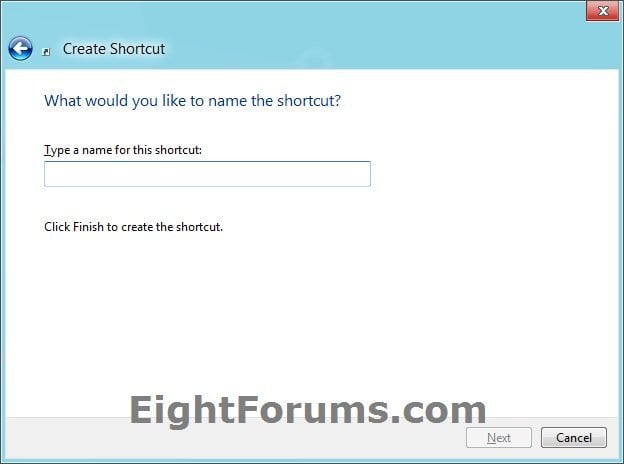
4. Type any name you would like to give the shortcut, and click/tap on the Finish button. (see screenshot below)

shortcut-2.jpg

5. Right click or press and hold on the new shortcut, and click/tap on Properties.

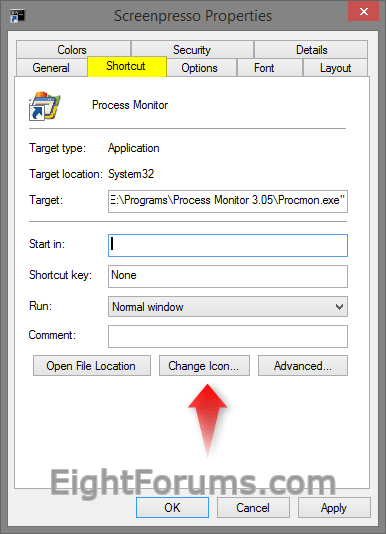
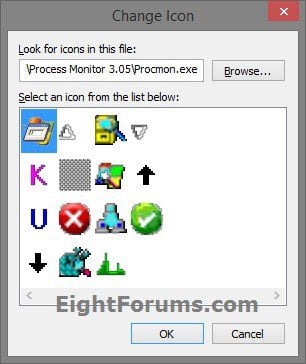
6. Click/tap on the Shortcut tab, then click/tap on the Change Icon button. (see screenshot below)

Shortcut-3.png

7. In the line under “Look for icons in this file”, copy and paste the same full path of the application file used in the shortcut below, and press Enter. (see screenshot below)

For example: E:\Programs\Process Monitor 3.05\Procmon.exe


Shortcut-4.jpg

8. Select (highlight) the icon you want for the shortcut, and click/tap on OK. (see screenshot above)
NOTE: You can use any icon that you would like instead though.

9. Click/tap on OK. (see screenshot below step 6)

10. In Vista and Windows 7, you can now Pin to Taskbar (Windows 7 only) or Pin to Start Menu, add to Quick Launchassign a keyboard shortcut to it, or move this shortcut to where you like for easy use.

11. In Windows 8, you can Pin to Taskbar on desktop, Pin to Start screen, add to Quick Launchassign a keyboard shortcut to it, or move this shortcut to where you like for easy use.


Impactos: 0

Deshabilitar Microsoft Compatibility Telemetry en Windows 10

Deshabilitar Microsoft Compatibility Telemetry en Windows 10

  1. Botón derecho en Símbolo del Sistema y selecciona Ejecutar como administrador.
  2. Copia y pega las siguientes claves y pulsa Enter tras cada comando:
  • sc delete DiagTrack
  • sc delete dmwappushservice
  • echo “” > C:\\ProgramData\\Microsoft\\Diagnosis\\ETLLogs\\AutoLogger\\AutoLogger-Diagtrack-Listener.etl
  • reg add “HKLM\\SOFTWARE\\Policies\\Microsoft\\Windows\\DataCollection” /v AllowTelemetry /t REG_DWORD /d 0 /f


Impactos: 0

Montar y desmontar unidades USB

image.png
Utilidad para montar y desmontar unidades USB

Para montar unidad USB

C:\Windows\System32\mountvol.exe E:\ \\?\Volume{c5f4a6e7-86be-11e6-a604-806e6f6e6963}\

Para desmontar unidad USB

C:\Windows\System32\mountvol.exe E:\ /p

Para desconectar puerto USB

C:\Windows\System32\rundll32.exe shell32.dll,Control_RunDLL hotplug.dll


Impactos: 0

Backup Linux -> Windows Rsync

Linux

Backup Linux -> Windows Rsync

Para hacer backup de una carpeta de Linux en una de un Windows sería (LINUX –> WINDOWS):

1º.- Crear un usuario ‘backup’ (por ejemplo) con contraseña ‘123456’ (solo es un ejemplo…) en el equipo con WINDOWS.
2º.- Crea una carpeta ‘copia’, comparte esa carpeta desde el equipo WINDOWS y dale solo permiso de acceso al usuario ‘backup’.
3º.- Desde el equipo origen, el LINUX, tenemos que realizar tres pasos que podemos automatizar en un script, que serian:
a.- Monta el recurso compartido en windows en algún directorio de linux.
$mount -t cifs //ip.del.equipo.windows/copia /media/ejemplo -o username=backup,password=123456
b.- Realiza la sincronización vía rsync.

$rsync -rltDvu –modify-window=1 –progress –delete /directorio/origen/copia /media/ejemplo

c.- Desmonta el recurso compartido.
$umount /media/ejemplo

Si esto lo ponemos en un script y lo ejecutamos mediante una tarea de cron cada hora, tendremos un “espejo” de nuestros datos desde el equipo LINUX hacia el equipo WINDOWS que nos servirá como una primera medida en cuanto a copias de seguridad. Editar /etc/crontab como root, y añadir las líneas:

# Copia de seguridad con rsync. Una vez cada hora, a horas en punto.
00 * * * * root bash /nuestro_script.sh

*La primera sincronización es una copia completa, por lo que dependiendo de los datos que tengas tardará bastante. Las sincronizaciones cada hora suelen ser bastante rápidas, en una hora no se suelen cambiar, crear o borrar muchas cosas. Yo lo tengo funcionando desde hace algún tiempo en un entorno de producción para backups desde un servidor samba en Debian hacia un 2008 server, y cero problemas.

Utilizar la siguiente notación: supongamos que queremos sincronizar 2 directorios ubicados en el disco C: y en el disco D:

rsync --update --recursive --progress /cygdrive/c/directorio_origen/* /cygdrive/d/directorio_destino/

Enlace externo : Otras Webs

Impactos: 0

Pase un nombre de usuario y contraseña al comando shutdown.exe de Windows

Windows 7

Pase un nombre de usuario y contraseña al comando shutdown.exe de Windows.

Aquí estaba mi escenario en el que me encontré no hace mucho. Tengo un dominio de Active Directory con un servidor fuera del dominio en su propio grupo de trabajo. Usó diferentes credenciales para la cuenta de administrador y luego lo que usa el dominio. Un día dejó de responder a RDP y varios programas de control que teníamos, así que tuvimos que reiniciar.

No hay problemas verdad? solo escribe en el siguiente comando:

shutdown /r /t 3 /m \\ServerName

No tan bien, desde el principio obtenemos ServerName: Acceso denegado. (5)

Así es, no tenemos permisos “Aún” … ¿Pero cómo enviamos los permisos a shutdown.exe? Si haces una parada /? no encontrará interruptores para el nombre de usuario y la contraseña, pero hay una manera de evitar esto.

Nos conectaremos a los servidores IPC $ y nos autentificaremos y luego ejecutaremos nuestro comando. Aquí está lo que haces: Primero, hagamos una conexión y autentiquemos ejecutando el siguiente cmd:

NET USE \\MyServer\IPC$ mypassword /USER:myuser

Si tienes éxito, ahora estamos listos para ejecutar el cmd shutdown en la misma ventana:

shutdown /r /t 3 /m \\ServerName

Enlace externo  http://www.squidworks.net/2011/07/how-to-pass-a-username-and-password-to-windows-shutdown-exe-command/

Impactos: 0