Processor affinity or CPU Pinning enables the binding and un-binding of a process or thread to a physical CPU or a range of CPUs, so that the process or thread in question will run only on the CPU or range of CPUs in question, rather than being able to run on any CPU
By default, Windows runs an application on all available cores of the processor. If you have a multi-core processor, then this tutorial will show you how to set the processor affinity of an application to control which core(s) of the processor the application will run on.
If the application and CPU supports Symmetric Multiprocessing (SMP) or HyperThreading (HT), then Windows will automatically adjust the application's usage of each processor core for the best performance. You will not gain much, if anything, from manually changing the processor affinity for these type of applications.
If you have more then one processor intensive applications running, then you could improve their performance by setting the processor affinity of their processes to run on a different core(s). This way they are not competing for the resources of the same core(s).
This tutorial will show you how to create a shortcut that will always run an application with a set CPU affinity by default in XP, Vista, Windows 7, and Windows 8.
Here's How:
1. This step will show you how many CPU cores you have, and how to figure the hex value to use at step 3 below for the CPU(s) you want to run the application on.
NOTE: If you should need any assistance with this step, then please feel free to post. I'll be happy to help.
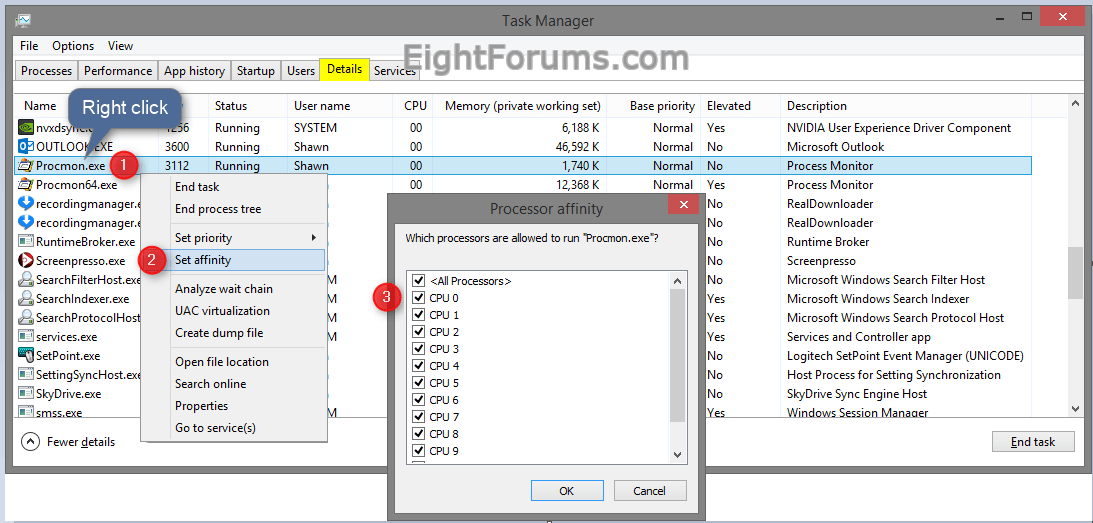
A) Open Task Manager (CTRL+Shift+ESC) in more details view, click/tap on the Processes (XP, Vista, Windows 7) OR Details (Windows 8) tab, right click or press and hold on any process in the Name column, and click/tap on Set affinity. (see screenshot below)
NOTE: This will show you how many CPU cores you have. I have 12 CPU cores numbered from 0 to 11.
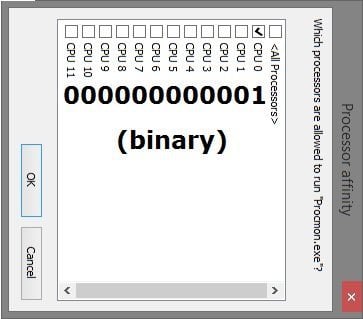
B) For how many CPU cores you have will also be how long the binary number will be. Since I have 12 CPU cores, the binary number will be 12 zeros 000000000000. Each zero in the binary number represents a CPU core number from right to left. In my case with 12 CPU cores, the far right 0 in the binary number will be for CPU 0, and the far left 0 will be for CPU 11. (see screenshot below)
C) For each CPU number you want to run the application on, replace 0 (off) with 1 (on) in the binary number for the CPU numbers.
For example, if I wanted to run the application only on CPU 0, then my binary number would be changed to 000000000001. To run the application on CPU 0 and CPU 3, I would use 000000001001. (see screenshot below)
D) Go the website below, and type your binary number from step 1C above into the Binary field. This will convert the binary number to a hexadecimal (hex) that you will need to use at step 3 below.
Website: Binary/Decimal/Hexadecimal Converter
For example, with my 000000000001 binary number, I get a hex value of 1. (see screenshot below)
2. Right click or press and hold on an empty area of your desktop, and click/tap on New and Shortcut.
3. Type the command below into the location area, and click/tap on the Next button. (see screenshot below)
cmd.exe /c start “Program Name” /affinity # “Full path of application file“
For example: I would type this command below exactly if I wanted to create a shortcut to run Process Monitor on only CPU 0 (step 1), and it's .exe file is located at “E:\Programs\Process Monitor 3.05\Procmon.exe“.
(For only on CPU 0)
cmd.exe /c start “Process Monitor” /affinity 1 “E:\Programs\Process Monitor 3.05\Procmon.exe“
(For on CPU 0 and CPU 3)
cmd.exe /c start “Process Monitor” /affinity 9 “E:\Programs\Process Monitor 3.05\Procmon.exe“
Substitute # in the command for the affinity # with the hex value (ex: 1) from step 1D above.
Substitute Full path of application file in the command with the full path of the file within quotes.

4. Type any name you would like to give the shortcut, and click/tap on the Finish button. (see screenshot below)
5. Right click or press and hold on the new shortcut, and click/tap on Properties.
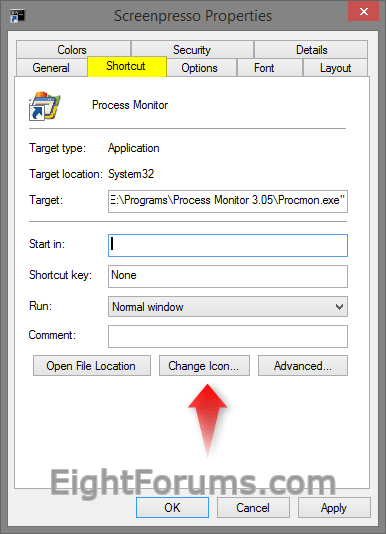
6. Click/tap on the Shortcut tab, then click/tap on the Change Icon button. (see screenshot below)
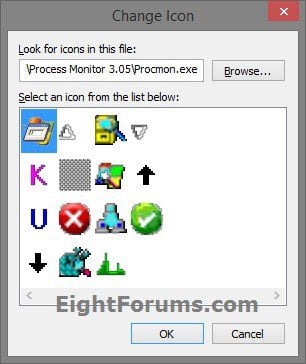
7. In the line under “Look for icons in this file”, copy and paste the same full path of the application file used in the shortcut below, and press Enter. (see screenshot below)
For example: E:\Programs\Process Monitor 3.05\Procmon.exe
8. Select (highlight) the icon you want for the shortcut, and click/tap on OK. (see screenshot above)
NOTE: You can use any icon that you would like instead though.
9. Click/tap on OK. (see screenshot below step 6)
10. In Vista and Windows 7, you can now Pin to Taskbar (Windows 7 only) or Pin to Start Menu, add to Quick Launch, assign a keyboard shortcut to it, or move this shortcut to where you like for easy use.
11. In Windows 8, you can Pin to Taskbar on desktop, Pin to Start screen, add to Quick Launch, assign a keyboard shortcut to it, or move this shortcut to where you like for easy use.
Simple Text
Impactos: 0

Impactos: 0


