HOW TO SET UP MULTIPLE STORES ON PRESTASHOP 1.7

HOW TO SET UP MULTIPLE STORES ON PRESTASHOP 1.7

PrestaShop's ability to develop and manage multiple stores within a single installation is one of its most impressive features. This feature is available from PrestaShop 1.5 and has been improved through every version of PrestaShop.

The multistore feature allows you to manage many shops in different domains from the same back office. It's easier and more convenient for website administrators when they only have to install or backup a module once to be able to utilize it across all stores in the multistore.

Perhaps you're wondering whether or not to add multi-store functionality in PrestaShop? It depends on your strategy and sales purpose. But in this article, I will give you some main reasons why PrestaShop multistore different domain is useful for you.

Why is multistore is recommended?

First of all, it is necessary to mention the ease of managing multiple stores from the same back office. Each module can be used for all your stores with just 1 install. It's simple, isn't it? You only need to do everything once and apply them to all stores.

Second, PrestaShop multistore different domains are useful for shop owners who want separate sales pages for wholesale and retail buyers. You may want varied prices for the same goods in your stores (apart from special discounts for a client or group of clients). Besides, you also don't want to disclose different rates for different customer groups.

Third, the price of the products will be different in different countries. You don't just want to sell to a certain consumer. You want to expand the market and sell your products to customers in different countries. Depending on the economy of each country, the currency value is not the same. Of course, your store's products also can be set at different prices for each market to boost sales.

Last but not least, convenience in customer service. Any customer orders, reviews, comments, questions from any of your stores will go to one place. And it would be easy for the store owners in customer service.

How to enable & configure a multistore in PrestaShop 1.7?

Step 1: You need to enable PrestaShop multistore mode before you can establish new stores.
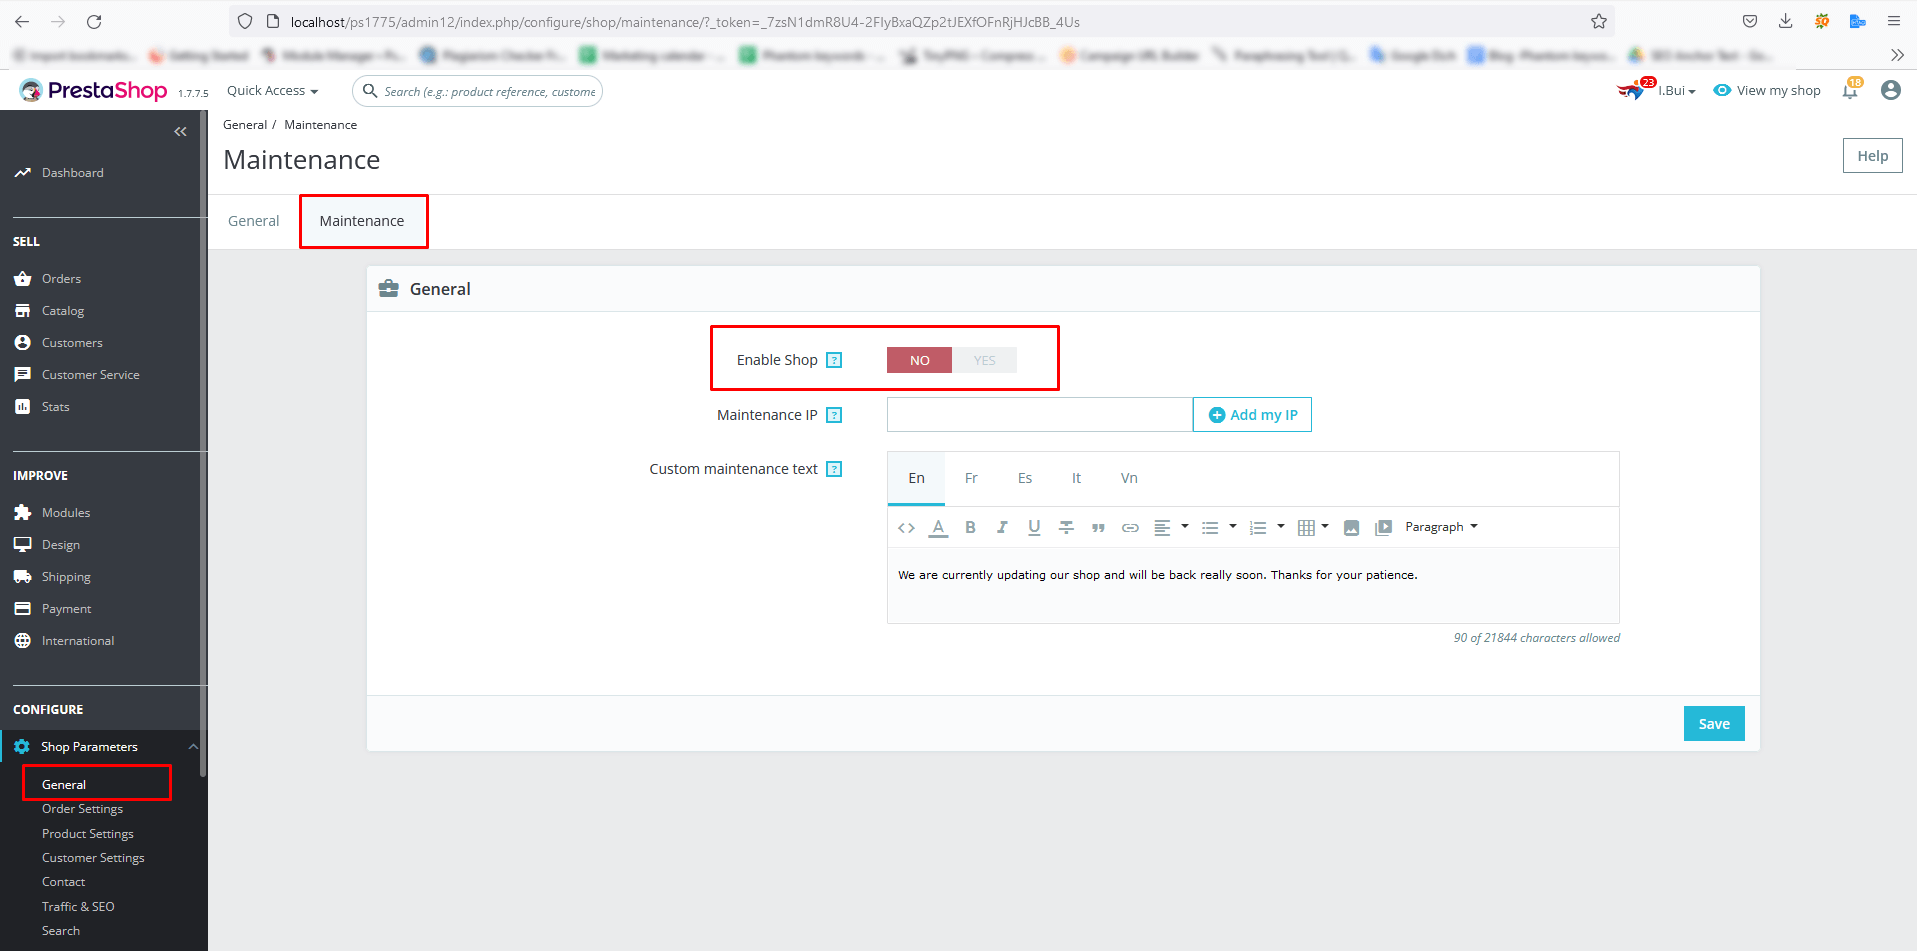
From your PrestaShop back office, find “Configure” section

Open “Shop Parameters” menu > select “General” to open the “General” setting page.

Turn on “Enable Multistore” option

Click the “Save” button.

After you enable multistore mode successfully, the “Multistore” option will be shown on Advanced Parameters Menu.

Step 2: How to set up Multistore

Find “Multistore” option on “Advanced Parameters” menu.

Click on “Add a new shop” then fill in the information in the required fields:

Shop name: enter your shop name.

Shop group: choose the shop group you want to link your new shop.

Category root: by default, it will be PrestaShop ‘Home’ category. If you want to use another created category, you can select here.

Associated categories: select categories you want to connect with your new shop

Themes: Select the theme which you want to display in the new store.

Click the “Save” button.

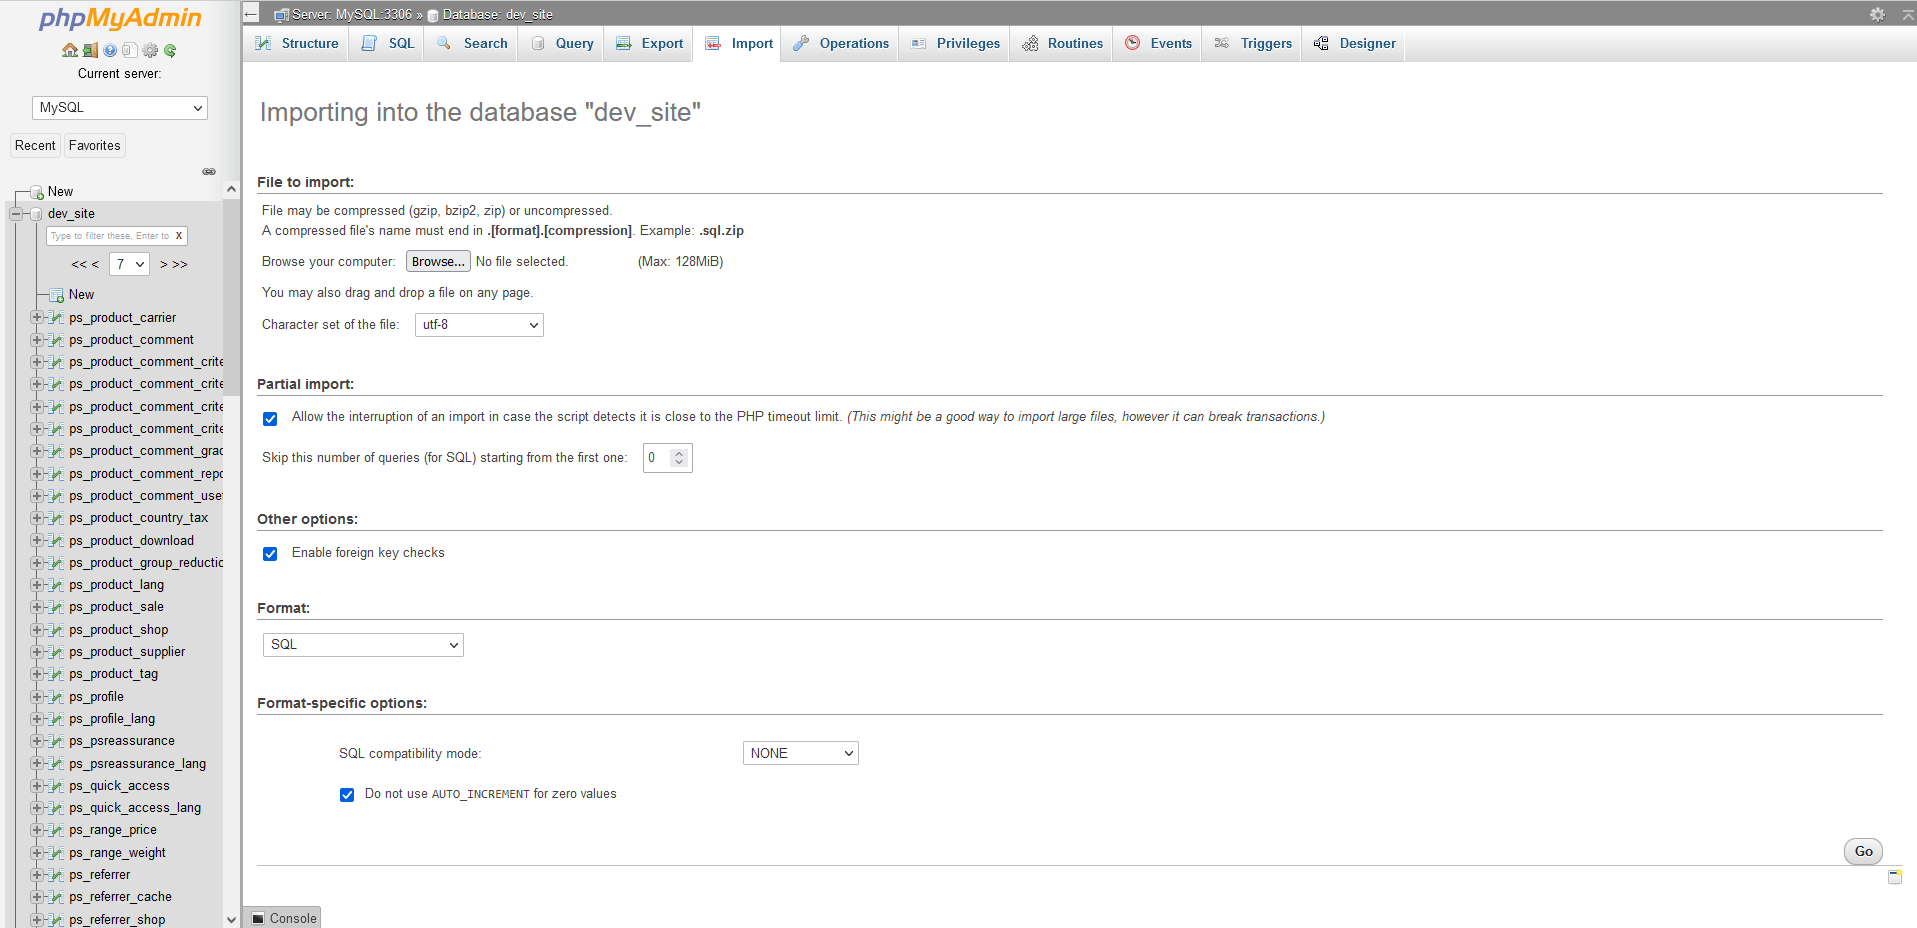
You also can import available data from another shop. PrestaHero provides migrate/upgrate modules that might help you too. You only need to turn on “Import data”, select the data you want to import, then click the “Save” button.

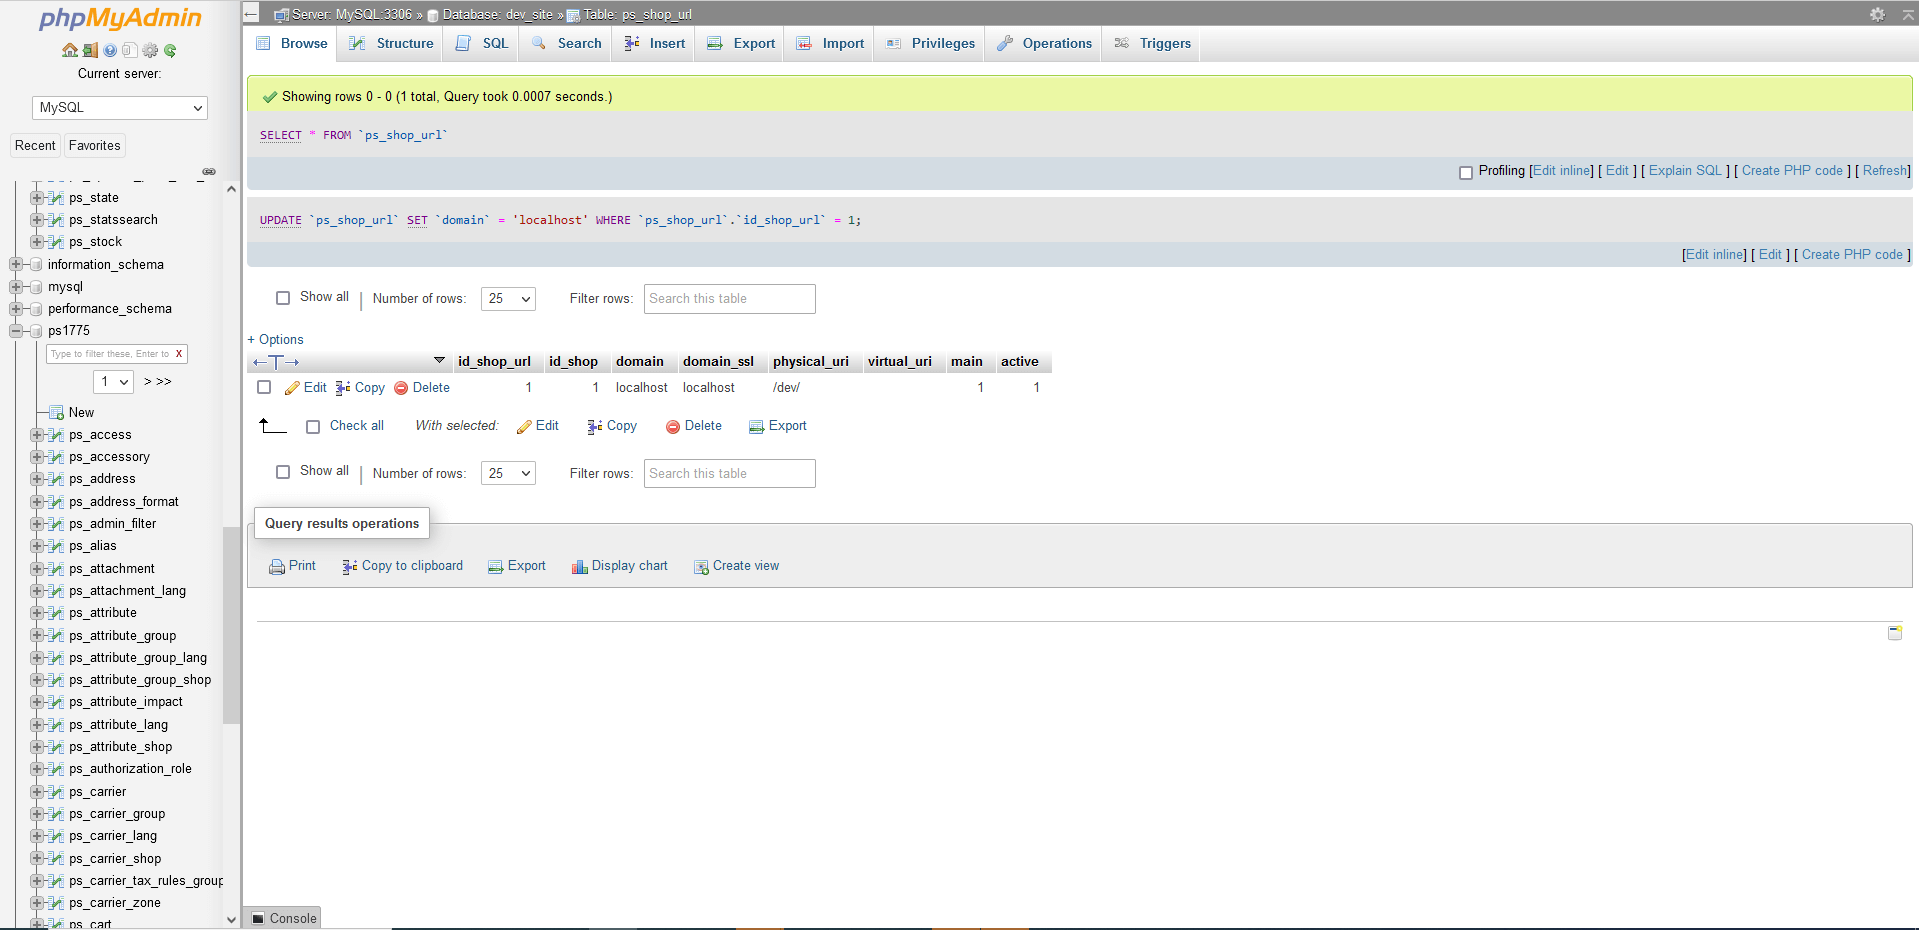
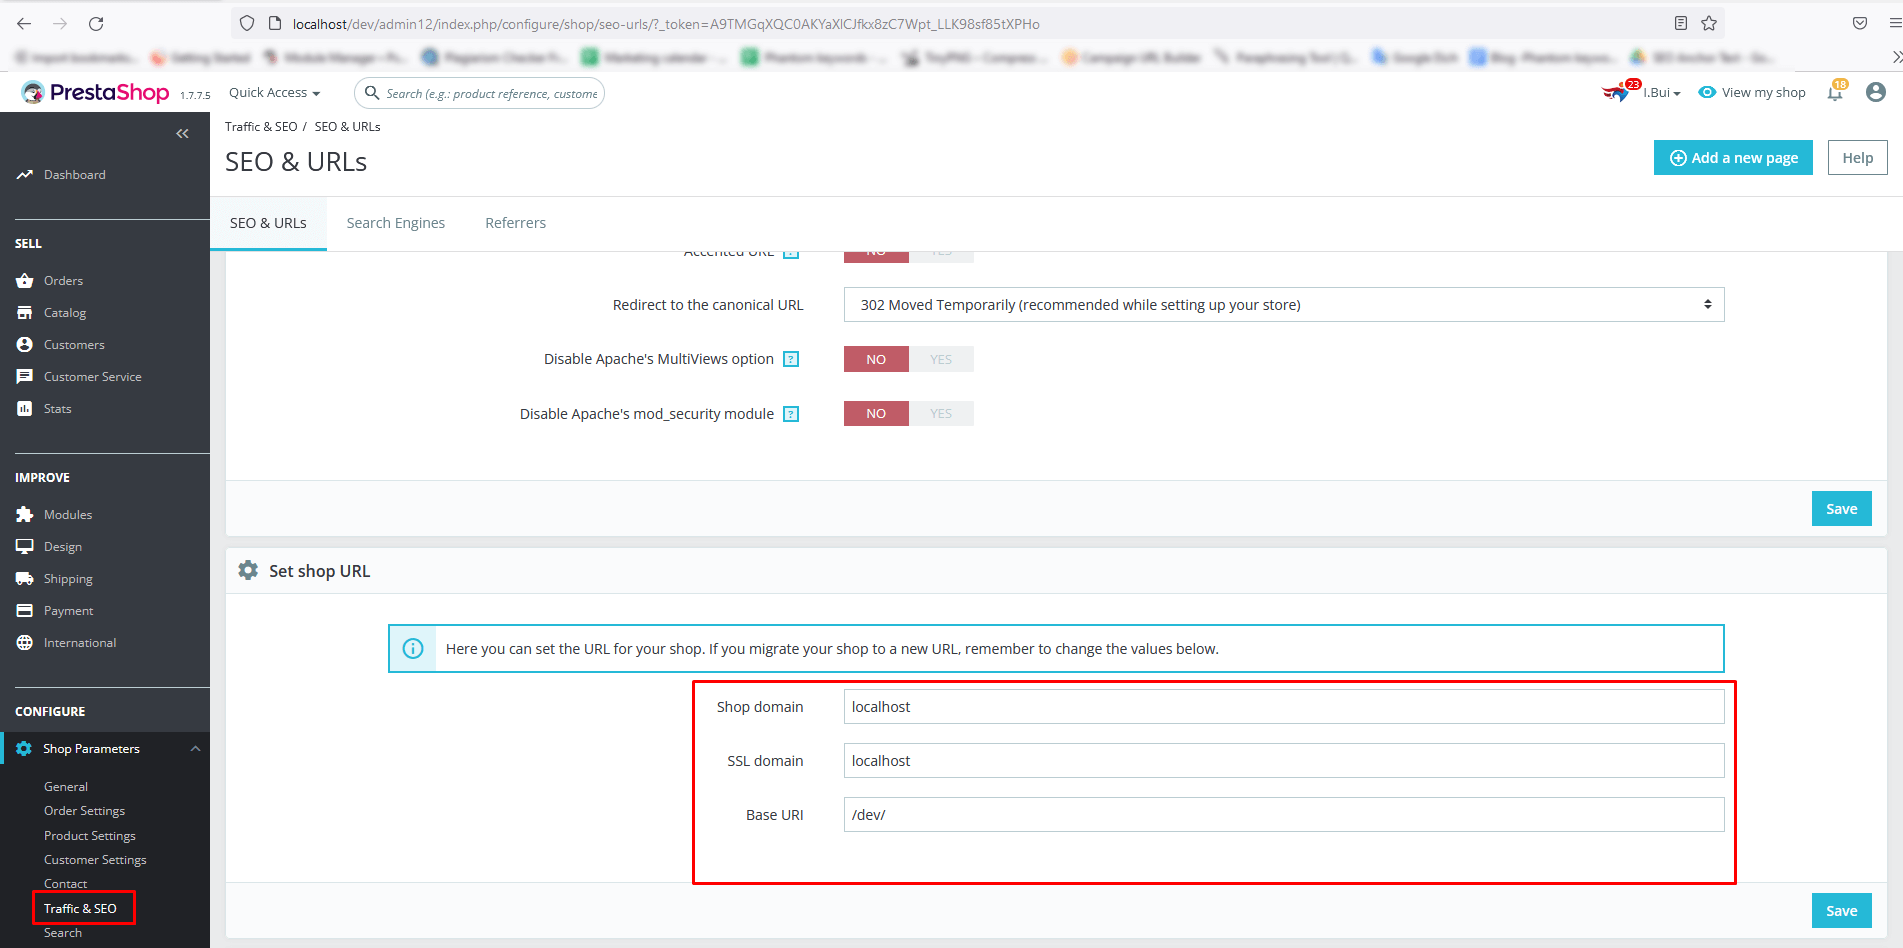
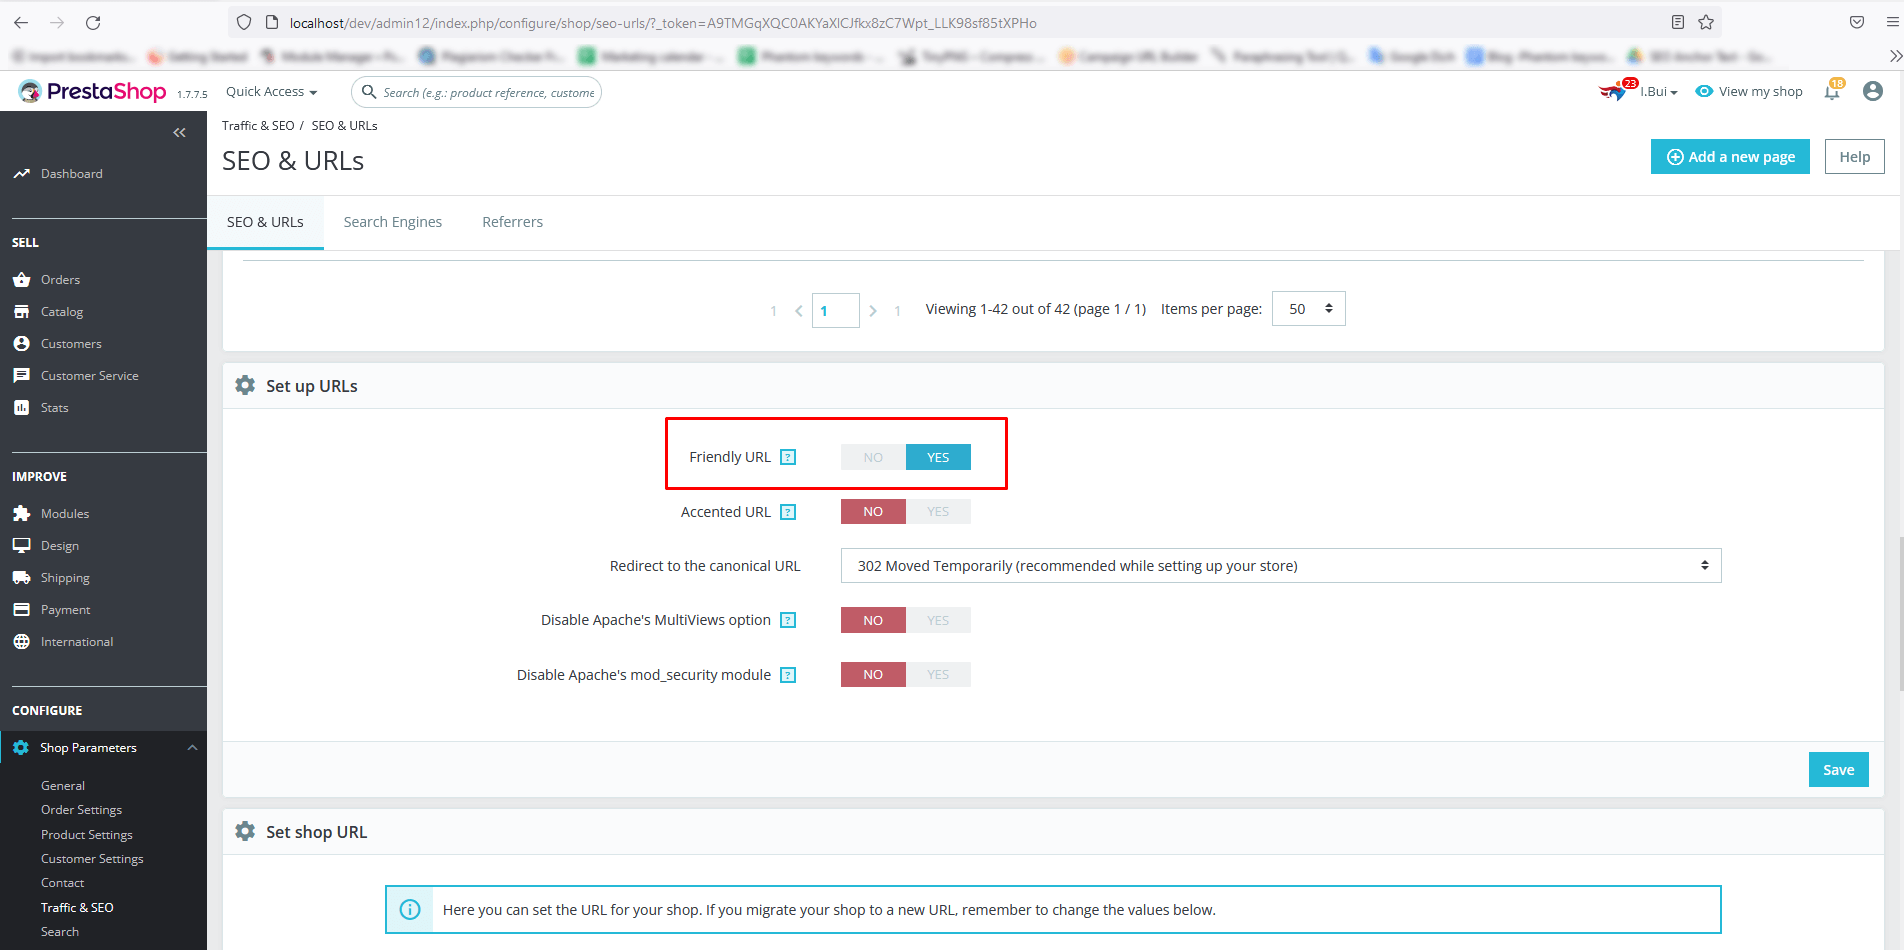
Step 3: Set a URL link for the shop

Now you have completed creating a new shop, now click on “Click here to set a URL for this shop” to create a URL for your new store.

You also can click on the “Edit” button to edit any information about your new shop if needed.

Specify the URL of your new store and click on the “Save” button.

You have just completed all steps to enable and configure a multistore in PrestaShop 1.7. Now you can start managing this new store.

Multistore is one of the great features of PrestaShop. It not only allows you to create multiple stores but also helps you manage them easily and conveniently. Through this article, hope that we have helped you understand more about PrestaShop's multiple store functions and how to setup Multistore on different domains in PrestaShop 1.7. If you have any question, please let me know via the comment section below.

fuente: https://prestahero.com/es/blog/post/34-how-to-set-up-multiple-stores-on-prestashop-17.html

Impactos: 0

BEST WAY TO CREATE A PRESTASHOP COPY SITE

BEST WAY TO CREATE A PRESTASHOP COPY SITE

¿Por qué es necesario crear un sitio de copia de PrestaShop? ¡Seguro que la mayoría de vosotros tenéis la misma respuesta!

En esta era de ciencia y tecnología en rápida evolución, la actualización regular de su tienda en línea es esencial para mantenerla llena de funciones y no desactualizada.

Sin embargo, ningún dueño de tienda quiere tener problemas para actualizar su sitio web y mostrar ese desorden a sus clientes. Por lo tanto, es imprescindible realizar pruebas de desarrollo en un sitio provisional antes de ejecutarlo oficialmente.

Y, por supuesto, la forma más sencilla y sencilla de hacerlo es clonar un sitio de PrestaShop en un entorno de prueba para realizar pruebas y solucionar problemas antes de ponerlo en funcionamiento.

Esta es también la forma en que la mayoría de los propietarios de sitios web eligen implementar, y también le recomendamos que la use. ¡Déjame guiarte con pasos detallados para duplicar un sitio de PrestaShop correctamente!

¿Cómo crear un sitio de copia de PrestaShop?

NOTA: las fotos de este tutorial se toman como ejemplo de una página localhost. Aplique lo mismo al directorio web en su servidor.

PASO 1: Cree una carpeta ” dev ” debajo de la carpeta raíz.

crear un sitio de copia de PrestaShop

PASO 2: comprima todos los archivos y carpetas del sitio en vivo en la carpeta raíz, luego copie ese código en la carpeta ” dev “.

crear un sitio de copia de PrestaShop

PASO 3: Exportar datos de la base de datos del sitio en vivo.

Inicie sesión en la base de datos de su sitio, busque y seleccione la base de datos actual de su sitio web en vivo. Vaya a la pestaña ” Exportar ” y exporte a un archivo .sql .

crear un sitio de copia de PrestaShop

PASO 4: Cree una nueva base de datos para el sitio ” dev “.

crear un sitio de copia de PrestaShop

PASO 5: Importe el archivo .sql que exportó a la nueva base de datos.

crear un sitio de copia de PrestaShop

PASO 6: Busque y abra el archivo /dev/app/config/parameters.php en la carpeta ” dev “:

crear un sitio de copia de PrestaShop

Cambie estos parámetros a los que configuró para la nueva base de datos: nombre de la base de datos + usuario de la base de datos + contraseña de la base de datos.

crear un sitio de copia de PrestaShop

PASO 7: Cambie los valores de las columnas ” domain ” y ” physical_uri ” en la tabla ” shop_url ” de la nueva base de datos al dominio y URI de su sitio ” dev “.

crear un sitio de copia de PrestaShop

PASO 8: Cambie el nombre del archivo ” htaccess ” a un nombre diferente.
Por ejemplo:

crear un sitio de copia de PrestaShop

PASO 9: Vaya a la carpeta var/cache/ y luego borre todos los archivos en esta carpeta de caché:

crear un sitio de copia de PrestaShop

PASO 10: Inicie sesión en la oficina administrativa del nuevo sitio. Vaya a la página Parámetros de la tienda/Tráfico y SEO , cambie el dominio de la tienda y el dominio SSL al nuevo dominio. Actualice el URI base si es diferente del nuevo dominio.

crear un sitio de copia de PrestaShop

PASO 11: deshabilite la URL amigable y guárdela, luego habilítela y guárdela nuevamente.

crear un sitio de copia de PrestaShop

¡Has hecho! ¡Ahora ha creado con éxito un sitio web de copia de PrestaShop y está listo para funcionar!

Consejos útiles para duplicar un sitio de PrestaShop

Antes de hacer cualquier cosa, debe considerar la seguridad. Cualquier cambio que realice en su tienda en línea podría romperla, así que asegúrese de haber realizado una copia de seguridad de todos sus datos antes de continuar.

Aquí hay algunos consejos que hemos recopilado de nuestras propias experiencias durante nuestro trabajo. ¡Espero que le ayude a clonar un sitio de PrestaShop cuando sea necesario!

Consejo 1: Configure el modo de “mantenimiento” para su tienda.

– Vaya a Parámetros de la tienda/General en su panel de administración de PrestaShop
– Abra la pestaña ” Mantenimiento “
– Desactiva tu tienda para no perder nuevos clientes y pedidos

crear un sitio de copia de PrestaShop

Consejo 2: haga una copia de seguridad de su sitio en vivo y guárdelo en su computadora.

Esto es extremadamente importante y siempre debe hacerlo para mantener segura la base de datos de su tienda en todas las circunstancias.

  • Copia de seguridad de sus archivos

Los archivos en el servidor web son lo primero que debe respaldarse. Contiene no solo el código fuente, sino también sus módulos y temas, imágenes y cualquier otro recurso necesario para ejecutar con éxito su tienda.

Las carpetas de su tienda en línea deben copiarse en otro lugar para finalizar este paso. Tal vez piense que simplemente copiar sus datos a otra carpeta en su servidor es suficiente, pero hacer una segunda copia en otro dispositivo es una buena medida de seguridad adicional.

Conéctese a su servidor a través de FTP, SSH o RDP, copie los archivos en otro lugar y luego descárguelos a su PC.

  • Base de datos de respaldo

La base de datos en la que se ejecuta PrestaShop es lo segundo que debe guardarse. Hay varias opciones para obtener un volcado de contenido de la base de datos (MySQL, PhpMyAdmin). Siéntase libre de usar sus herramientas siempre que se asegure de que puede obtener todos los datos que necesita.

Consejo 3: exporte la base de datos de destino

Copiar todo el sitio llevará mucho tiempo, recomendamos usar la técnica “personalizada” porque le brinda más opciones para personalizar su volcado. Asegúrese de que todas sus tablas, vistas y otros objetos estén seleccionados para la copia de seguridad.

Debe exportar la base de datos de destino con la que necesita trabajar seleccionando ” Personalizar: mostrar todas las opciones posibles “.

crear un sitio de copia de PrestaShop

Es posible que haya pensado que crear un sitio de copia de PrestaShop es una tarea complicada, pero no lo es. Incluso es bastante fácil y tiene varias formas de hacerlo. Siga nuestros pasos anteriores para clonar su tienda y recuerde revisar algunos consejos que brindamos para mayor comodidad. ¡Le deseo éxito!

fuente: https://prestahero.com/es/blog/post/80-create-a-prestashop-copy-site.html

Impactos: 0

MODIFICAR PRECIOS PRESTASHOP MASIVAMENTE

En muchas ocasiones necesitamos cambiar los precios en nuestro Prestashop, pero no sabemos como hacerlo de forma masiva.
Esto es muy útil cuando subimos todos los precios un %, por ejemplo, queremos subir todos los precios de nuestra tienda un 5%, este es el momento en el que buscamos por internet y nos salen muchas posibles soluciones, pero ninguna se adapta exactamente a nuestro caso.Nosotros vamos a realizar esta subida de precios, operando directamente en un archivo .csv y daremos unos pequeños trucos para hacerlo de forma correcta.En este articulo vamos a ver como hacerlo de forma sencilla, segura y eficaz, empecemos:1 – Entramos a nuestro prestashop y exportamos todos nuestros productos en formato CSV.2 – Una vez descargado es MUY IMPORTANTE ABRIR CON EL LIBREOFFICE, si no lo tenemos instalado podemos descargarlo desde el siguiente enlace Libreoffice, esto es importante puesto que el Excel no trata correctamente los formatos importados en .csv, sobre todo cuando queremos realizar operaciones matemáticas sobre alguna de nuestras columnas.3 – Veremos que se abre un archivo con el siguiente formato:

4 – Nos encontramos con el primer problema, si intentamos hacer una operación sobre la columna de Precio Base, veremos que nos da un error así (#¡VALOR!), esto se debe a que el formato de dichas celdas no es correcto, para poder operar sobre ellos tenemos que sustituir los puntos (.) por comas (,), para ello seleccionamos la columna entera y pulsamos control+alt+B, se nos abrirá el siguiente cuadro:

5 – En esta ventana reemplazamos los puntos por las comas y pulsamos en reemplazar todo (recuerda tener seleccionada solo la columna de precio base).

6 – Ahora ya podemos hacer operaciones, yo normal creo otra columna a continuación y la utilizo para obtener los resultados, por ejemplo en nuestro caso queremos incrementar los precios un 5% por lo que la forma más rápida de hacerlo seria con la siguiente funciona =F2*1.05, esto lo aplicaríamos en cada fila y obtendríamos los valores totales:

7 – Ahora copiamos esa columna y tenemos que pegarla en la columna precio base, ya que estos van a ser nuestros nuevos precios, aquí de nuevo es MUY IMPORTANTE pegarlo con la opción pegado especial -> numérico (podemos acceder a ella con el botón derecho del ratón)

8 – Llegados a este punto solo tendríamos que borrar la columna que hemos utilizado para obtener los resultados y guardar nuestro documento como .csv, de esta forma ya tenemos listo nuestro documento para importarlo de nuevo.

9 – Ahora vamos a nuestro prestashop, entramos en la pestaña de productos y a la derecha (justo encima de la tabla) tenemos en botón de importar, nos llevará a una página que tenemos que configurar de la siguiente forma:

10 – Seleccionamos la opción productos y es MUY IMPORTANTE marcar la opción “Usar la referencia de los productos como clave”, para que el sistema sepa que estamos actualizando productos y no subiendo productos nuevos.

11 – Nos encontraremos con una página en la cual tenemos que decir que tipo de atributo se corresponde con cada columna, en el este caso, como solo queremos actualizar los precios, vamos a ignorar todas las columnas menos el ID y la de precio sin iva, como mostramos a continuación.

13 – Ya solo nos queda darle al botón de importar CSV y esperar a que se termine de importar, es importante tener en cuenta la capacidad del servidor, para asegurarnos una correcta importación, NO RECOMIENDO que el .csv tenga más de 2500 líneas o referencias, en el caso de tener más es mejor dividirlo en varios .csv y repetir el proceso varias veces, de esta forma tendremos más controlados los datos y evitaremos posibles errores.

Y hasta aquí nuestro artículo, esperemos que hayamos aclarado un poco el procedimiento de incrementar el precio de forma masiva en prestashop.

Impactos: 0

How to install PrestaShop on Ubuntu 22.04 Server


Steps to install PrestaShop on Ubuntu 22.04 Server

The steps given here to set up PrestaShop on Ubuntu 22.04 will be the same for Ubuntu 20.04 and 18.04 including Debian 11 server.

What do we need to perform in this tutorial?

⇒ A clean Ubuntu 22.04 server
⇒ A user with sudo access
⇒ Internet connection

1. Update Ubuntu 22.04 Server

The first thing to perform after login into the Ubuntu server to install PrestaShop is to make sure our system is up to date. For that run the given command using APT.

sudo apt update && sudo apt upgrade


2. Install Apache web server

We need a web server to deliver the content generated by Prestashop using PHP. Hence, here we are opting popular Apache web server. To install it on Ubuntu run:

sudo apt install apache2

Enable Apache mod_rewrite module 

sudo a2enmod rewrite
sudo systemctl restart apache2


3. Install the MariaDB database

Well, to store the data we can either use MySQL or its fork MariaDB. Here we are going for MariaDB, those who want to use MySQL can follow this tutorial. Just like Apache, packages to install the MariaDB server are also available to download using the default system repository of Ubuntu. Hence, simply run:

sudo apt install mariadb-server

To ensure the service of the Database is enabled and running, use:

sudo systemctl enable --now mariadb

Now, secure your Database instance:

sudo mysql_secure_installation


Questions                                                                            Answers

Enter current password for root (enter for none): Hit the Enter key
Switch to unix_socket authentication [Y/n]: Type – y and hit the Enter key
Change the root password? [Y/n]:  If you want to change the root password for MariaDB then press Y otherwise – n

Install MariaDB for PRestashop

Remove anonymous users? [Y/n]: Type – y and hit the Enter key
Disallow root login remotely? [Y/n]: Type – y and hit the Enter key
Remove the test database and access it. [Y/n]: Type – y and hit the Enter key
Reload privilege tables now? [Y/n]: Type – y and hit the Enter key

Secure MariaDB installation


4. Create Database for PrestaShop

Now, let’s create a Database to store the data generated by the PrestaShop while installing and later, such as product data, users, and more…

sudo mysql

Note:presta_h2s is the database here and prestauser is the user and the password is the password we used for the database user. Change them as per your choice.

Create Database

create database `presta_h2s`;

Create a User with a password

create user 'prestauser'@'localhost' identified by 'password';

Grant all permissions of Database to User

GRANT ALL PRIVILEGES ON `presta_h2s`.* to `prestauser`@localhost;
exit;


5. Install PHP 7.4 on Ubuntu 22.04

As we know PrestaShop is a PHP-based e-commerce platform, hence, our system should have PHP and required extensions by it to make this platform work properly. The version of PHP while doing this article on Ubuntu 22.04 was PHP8.1. However, the PrestaShop requirement was PHP7.4, hence we have to install that.  But the PHP 7.4 is not available to get using the default system repository, therefore add Ondrej PPA.

sudo apt install software-properties-common
sudo add-apt-repository ppa:ondrej/php -y

Now install PHP 7.4:

sudo apt install php7.4 php7.4-{cli,common,curl,zip,gd,mysql,xml,mbstring,json,intl}

Now, change the memory and upload file limits. 

To find the path of your php.ini file run the below command:

php -i | grep -i php.ini

Now, see the path and use it to edit the php.ini file

In our case it was:

sudo nano /etc/php/7.4/cli/php.ini

install PHP 7.4 on Ubuntu 22.04

Find two lines:

Change memory_limit value to 128M

memory_limit= 128M

SET PHP memroy limit

And also increase the upload size of the file to 16 MB or 32 MB, as per your requirements.

upload_max_filesize = 32M

Upload MAx size PHP prestashop ubuntu 22.04

Save the file using Ctrl+O, hit the Enter key, and then exit the file using Ctrl+X.

Finally, restart the apache

sudo systemctl restart apache2


6. Download PrestaShop on Ubuntu 22.04

Get the latest version of the PrestaShop directly on your system using the command terminal. Here is the Github page link to get the latest release, however, use the given command to download it.

sudo apt install curl
cd /tmp
curl -s https://api.github.com/repos/PrestaShop/PrestaShop/releases/latest | grep "browser_download_url.*zip" | cut -d : -f 2,3 | tr -d \" | wget -qi -


7. Unzip and move Prestashop to the www folder

After downloading the latest version of the PrestaShop, unzip it and move the folder to the webroot directory of the web server. So, that it could be used safely for calling through a web browser.

sudo unzip prestashop_*.zip -d /var/www/prestashop/

Note: If you don’t have an unzip tool, then install it using the command:sudo apt install unzip


8. Change Permission to Apache user

Change the permission of the Prestashop folder to Apache’s www-data user and group, for that the syntax will be:

sudo chown -R www-data: /var/www/prestashop/


9. Configure PrestaShop virtual Host for Apache

In case you are planning to use multiple domains on your Apache webserver then creating a virtual host for Prestashop will be a great idea. This will also let us use our domain for accessing the front-end and backend of the PrestaShop without showing the directory in which we have kept its all files. Therefore create a new Apache configuration file and enable make it.

sudo nano /etc/apache2/sites-available/prestashop.conf

Copy-paste the following lines in the file and save them by using Ctrl+X and type Y and hit the Enter key.

Note: change your_example.com, the domain you want to use for PrestaShop.

<VirtualHost *:80> ServerAdmin admin@your_example.com ServerName your_example.com ServerAlias www.your_example.com DocumentRoot /var/www/prestashop <Directory /var/www/prestashop> Options +FollowSymlinks AllowOverride All Require all granted </Directory> ErrorLog /var/log/apache2/prestashop-error_log CustomLog /var/log/apache2/prestashop-access_log common </VirtualHost>

Enable the Prestashop Apache configuration and restart the web server.

sudo a2ensite prestashop.conf

Disable the default Apache page

sudo a2dissite 000-default.conf
sudo systemctl restart apache2


10. Access Ubuntu 22.04 running Ecommerce Store

Everything is ready and it’s time to access our Ubuntu 22.04 or 20.04 installed PrestaShop eCommerce store for further settings. Open the browser on your local system and type the Ip address or domain.com pointing to the store.

http://ip-address

http://your_domain.com


Impactos: 0

¿Cómo arreglar Apache2 no ejecutando archivos PHP?

Paso 1: Modificar el archivo .conf
Lo primero que debemos hacer es modificar el archivo de configuración principal de Apache2. Para hacer esto, abre una ventana de la terminal y emite el comando:

sudo nano /etc/apache2/apache2.conf

Con apache2.conf abierto, todo lo que tiene que hacer es agregar la siguiente linea al final del archivo:

<FilesMatch \.php$>
SetHandler application/x-httpd-php
</FilesMatch>

Guarda y cierra apache2.conf.

Paso 2: Habilitar / deshabilitar módulos
Para que PHP funcione correctamente, debes deshabilitar el módulo mpm_event y habilitar los módulos mpm_prefork y php7. Para hacer esto, regresa a la ventana de la terminal y escribe el comando:

sudo a2dismod mpm_event && sudo a2enmod mpm_prefork && sudo a2enmod php7.0

Paso 3: Reiniciar Apache 2
Está todo listo para reiniciar Apache2. Debido a que hemos deshabilitado / habilitado los módulos, tenemos que reiniciar por completo Apache2 (en lugar de volver a cargar los archivos de configuración). Para reiniciar Apache2, regresa a la ventana de la terminal y emite el comando:

sudo service apache2 restart

Ahora deberías poder apuntar un navegador a un archivo PHP y verlo ejecutarse correctamente, en lugar de guardarlo en su disco local o mostrar código en su navegador.

fuente : https://support.hostinger.es/es/articles/3963793-como-arreglar-apache2-no-ejecutando-archivos-php


Impactos: 0

The update cannot be installed because we will be unable to copy some files. This is usually due to inconsistent file permissions.: wp-admin/includes/update-core.php

The update cannot be installed because we will be unable to copy some files. This is usually due to inconsistent file permissions.: wp-admin/includes/update-core.php

  • find /var/www/example.com -type d -exec chmod 755 ‘{}’ \;
  • find /var/www/example.com -type f -exec chmod 644 ‘{}’ \;
  • chown -R  www-data:www-data   /var/www/example.com;


Impactos: 0

Cómo configurar IMAP en clientes de correo de GMAIL o GOOGLE APPS


Cómo configurar IMAP en clientes de correo de GMAIL o GOOGLE APPS

Instrucciones para la configuración de correo entrante con IMAP de Gmail (Google, G.Suite):

  • Servidor de correo entrante (IMAP) – requiere SSL
    • imap.gmail.com
    • Puerto: 993
    • Requiere SSL: Sí
    • Modo de identificación: En Thunderbird, ahora podemos seleccionar como tipo de contraseña OAuth2. Si usamos contraseña normal, tenemos que tener Activada “aplicaciones menos seguras” en la configuración de Google.
  • Servidor de correo saliente (SMTP) – requiere TLS
    • smtp.gmail.com
    • Puerto: 465 o 587
    • Requiere SSL: Sí
    • Requiere autenticación: Sí
    • Utilizar la misma configuración que mi servidor de correo de entrada:
  • Nombre completo o Su nombre: [tu nombre]
  • Nombre de cuenta o Nombre de usuario: tu dirección completa de Gmail (nombredeusuario@gmail.com). Si eres usuario de Google Apps, escribe nombredeusuario@tudominio.com
  • Dirección de correo electrónico: tu dirección completa de Gmail (nombredeusuario@gmail.com). Si eres usuario de Google Apps, escribe nombredeusuario@tudominio.com.
  • Contraseña: tu contraseña de Gmail.


Impactos: 0

Cómo instalar la CPU XMR STAK para Monero Mining en Ubuntu 16.04

Cómo instalar la CPU XMR STAK para Monero Mining en Ubuntu 16.04

¡Monero Mining es para todos!

A diferencia de Etherum, puedes minar Monero con casi cualquier cosa, incluso con la CPU de tu portátil antiguo. Eso no producirá muchas ganancias, pero es una posibilidad. Además de eso, la minería de GPU no ofrece un aumento sustancial en el poder de minería como en Ethereum. Aquí, una GPU dedicada puede ofrecer solo 2 a 3 veces más hashrate que una nueva CPU, en lugar de 10 a 20 veces la de Ethereum. Esto significa que es mejor configurar todas sus computadoras portátiles antiguas en la mía que comprar una nueva GPU, a menos que, por supuesto, tenga la intención de configurar una granja completa.

También puedes minar con una CPU y una GPU al mismo tiempo. Tenga en cuenta que esto probablemente tenga un mayor consumo de energía, y debe calcular si lo que está haciendo es rentable. Veamos cómo minar usando solo una CPU.

Cómo instalar XMR-STAK-CPU – Herramienta de minería Monero

Recomiendo usar xmr-stak-cpu, una solución de código abierto muy rápida y rentable. En primer lugar, tendremos que instalar dependencias del programa. También tendremos que compilarlo, por lo que también necesitamos software para eso. Correr:

sudo apt install libmicrohttpd-dev libssl-dev cmake build-essential libhwloc-dev

Luego, descarga el minero:

wget https://github.com/fireice-uk/xmr-stak-cpu/archive/master.zip

Descomprímelo:

unzip master.zip

Ingrese al nuevo directorio:

cd xmr-stak-cpu-master

Ejecute CMake:

cmake .

Una vez que hayas terminado, instala el minero:

make install

Debería crear una carpeta “bin”. Ingrese a la carpeta:

cd bin

Cómo configurar

Y edite el archivo de configuración. Por lo general, todo lo que necesita hacer es especificar la dirección de su grupo, la dirección de su billetera y la “contraseña del grupo”, que para el grupo que estamos usando es solo el nombre de la máquina y el correo electrónico. Aquí hay un ejemplo.

nano config.txt
„pool_address” : „pool.supportxmr.com:3333”, „wallet_address” : „yourmonerowalletaddresshere”, „pool_password” : „worker:name@email.com”,

Una vez que establezca el archivo de configuración, ejecute

./xmr-stak-cpu

¡Y su máquina comenzará a minar con su CPU!

Impactos: 0

¿Cómo evitar que un cron job me envíe un email cada vez que se ejecuta?

¿Cómo evitar que un cron job me envíe un email cada vez que se ejecuta?


1. Redirigir la salida

0   */2 *   *   *   /bin/sh /ruta/mi-script.sh >/dev/null 2>&1 

Esto lo que hace es redirigir la salida estándar y la salida de error al clásico colector de basura de unix /dev/null. Podrías eventualmente dejar la salida de error para que pase por el mail y desactivar solo la estándar:

0   */2 *   *   *   /bin/sh /ruta/mi-script.sh >/dev/null 

2. Quitar el MAILTO

Si tienes acceso a editar el archivo /etc/crontab puedes editar la variable MAILTO dejándola en blanco MAILTO=""

3. Configurar el demonio del cron para que la salida vaya a un log

Si puedes editar /etc/sysconfig/crond, podrías agregar el parámetro -s para redirigir la salida al log del sistema y -m off para deshabilitar el envío de mails

Ten en cuenta que las opciones 2 y 3 requieren reiniciar el demonio del cron.

Referencia: https://www.putorius.net/2015/03/stop-cron-daemon-from-sending-email-for.html

Impactos: 0

Habilite VNC en implementaciones de VMware

image.png

This article outlines the steps needed to enable VNC on VMware, so that the VNC console can be used within the Platform9 UI.
Step 1 – Changes Needed on the ESXi Hosts Housing the Virtual Machines

SSH to the ESXi host (not vCenter). We need to open the VNC ports on the ESXi firewall. These steps need to be performed on all the ESX hosts that are part of the clusters authorized with Platform9 controller. An automated script for doing same is coming soon.

chmod 644 /etc/vmware/firewall/service.xml
chmod +t /etc/vmware/firewall/service.xml
vi /etc/vmware/firewall/service.xml

Create a new service block before the end of ConfigRoot tag.

<service id=”new unique id within this file”>
<id>VNC</id>
<rule id=”0000″>
<direction>inbound</direction>
<protocol>tcp</protocol>
<porttype>dst</porttype>
<port>
<begin>5900</begin>
<end>6199</end>
</port>
</rule>
</service>

Step 2 – Add Firewall Rules to the ESXi Firewall and Verify that Ports Have Been Opened

On the ESXi host, execute the following commands

esxcli network firewall refresh
esxcli network firewall ruleset set –ruleset-id VNC –enabled true

Verify that the firewall rules were applied and the ports are open by executing the following commands

esxcli network firewall ruleset list
# You should see a rule labelled VNC in the output
esxcli network firewall ruleset rule list
# You should see the details of VNC rule i.e. port range, protocol, direction, etc.

Step 3 – Enable VNC for Existing Virtual Machines (Optional)

To enable VNC console for existing VMs, power off the VM and use one of the following:

Using vSphere Web Client
Click on “edit settings”-> Select the “VM Options” tab->Expand the “Advanced” section-> click on “Edit configuration” and add the settings mentioned at the end of this step
Directly on ESXi Host
Edit the *.vmx file of the corresponding VM and the lines mentioned here.

RemoteDisplay.vnc.enabled = “TRUE”
RemoteDisplay.vnc.port = “<port>” # Port between 5900 and 6199

IMPORTANT NOTES –
1. The key point in the step 3 is to make sure that the port number that you are adding does not collide with any other VM. One way to verify that is to SSH into the ESXi host and run grep on all the *.vmx files and choose a port that is not present in the output

grep “vnc.port” */*/*/*/*.vmx

2. For VNC console to work, the appliance, the ESX host, and the browser where the VNC is being accessed need to have IP connectivity to each other.

Fuente:
https://docs.platform9.com/support/enable-vnc-on-vmware-deployments/

#vmware, #Linux


Impactos: 0