MODIFICAR PRECIOS PRESTASHOP MASIVAMENTE

En muchas ocasiones necesitamos cambiar los precios en nuestro Prestashop, pero no sabemos como hacerlo de forma masiva.
Esto es muy útil cuando subimos todos los precios un %, por ejemplo, queremos subir todos los precios de nuestra tienda un 5%, este es el momento en el que buscamos por internet y nos salen muchas posibles soluciones, pero ninguna se adapta exactamente a nuestro caso.Nosotros vamos a realizar esta subida de precios, operando directamente en un archivo .csv y daremos unos pequeños trucos para hacerlo de forma correcta.En este articulo vamos a ver como hacerlo de forma sencilla, segura y eficaz, empecemos:1 – Entramos a nuestro prestashop y exportamos todos nuestros productos en formato CSV.2 – Una vez descargado es MUY IMPORTANTE ABRIR CON EL LIBREOFFICE, si no lo tenemos instalado podemos descargarlo desde el siguiente enlace Libreoffice, esto es importante puesto que el Excel no trata correctamente los formatos importados en .csv, sobre todo cuando queremos realizar operaciones matemáticas sobre alguna de nuestras columnas.3 – Veremos que se abre un archivo con el siguiente formato:

4 – Nos encontramos con el primer problema, si intentamos hacer una operación sobre la columna de Precio Base, veremos que nos da un error así (#¡VALOR!), esto se debe a que el formato de dichas celdas no es correcto, para poder operar sobre ellos tenemos que sustituir los puntos (.) por comas (,), para ello seleccionamos la columna entera y pulsamos control+alt+B, se nos abrirá el siguiente cuadro:

5 – En esta ventana reemplazamos los puntos por las comas y pulsamos en reemplazar todo (recuerda tener seleccionada solo la columna de precio base).

6 – Ahora ya podemos hacer operaciones, yo normal creo otra columna a continuación y la utilizo para obtener los resultados, por ejemplo en nuestro caso queremos incrementar los precios un 5% por lo que la forma más rápida de hacerlo seria con la siguiente funciona =F2*1.05, esto lo aplicaríamos en cada fila y obtendríamos los valores totales:

7 – Ahora copiamos esa columna y tenemos que pegarla en la columna precio base, ya que estos van a ser nuestros nuevos precios, aquí de nuevo es MUY IMPORTANTE pegarlo con la opción pegado especial -> numérico (podemos acceder a ella con el botón derecho del ratón)

8 – Llegados a este punto solo tendríamos que borrar la columna que hemos utilizado para obtener los resultados y guardar nuestro documento como .csv, de esta forma ya tenemos listo nuestro documento para importarlo de nuevo.

9 – Ahora vamos a nuestro prestashop, entramos en la pestaña de productos y a la derecha (justo encima de la tabla) tenemos en botón de importar, nos llevará a una página que tenemos que configurar de la siguiente forma:

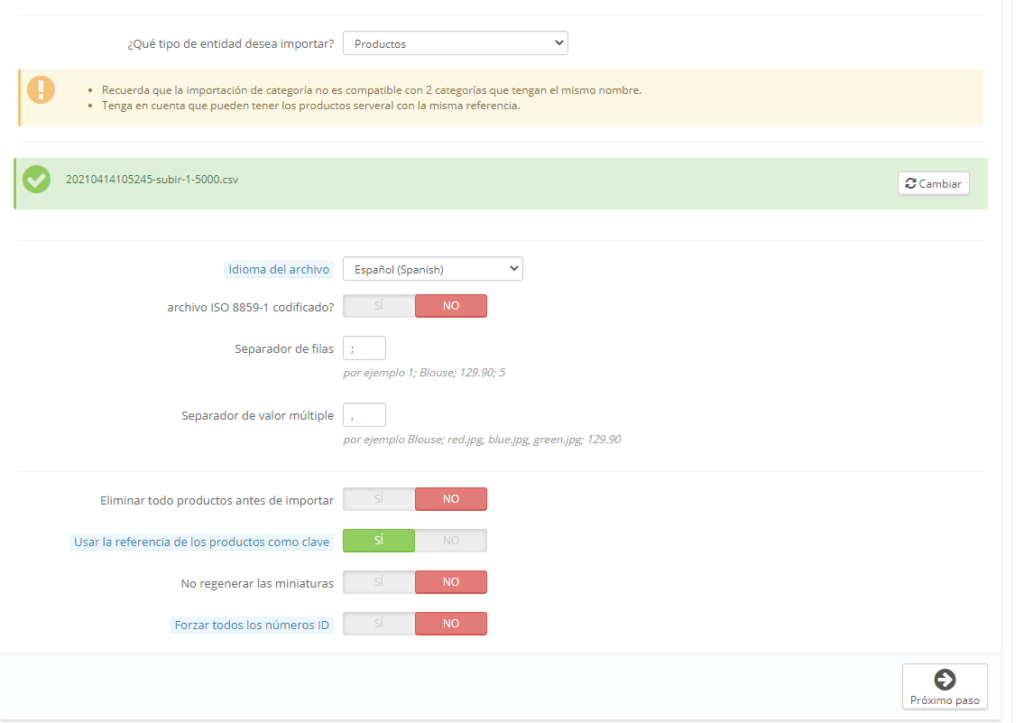
10 – Seleccionamos la opción productos y es MUY IMPORTANTE marcar la opción “Usar la referencia de los productos como clave”, para que el sistema sepa que estamos actualizando productos y no subiendo productos nuevos.

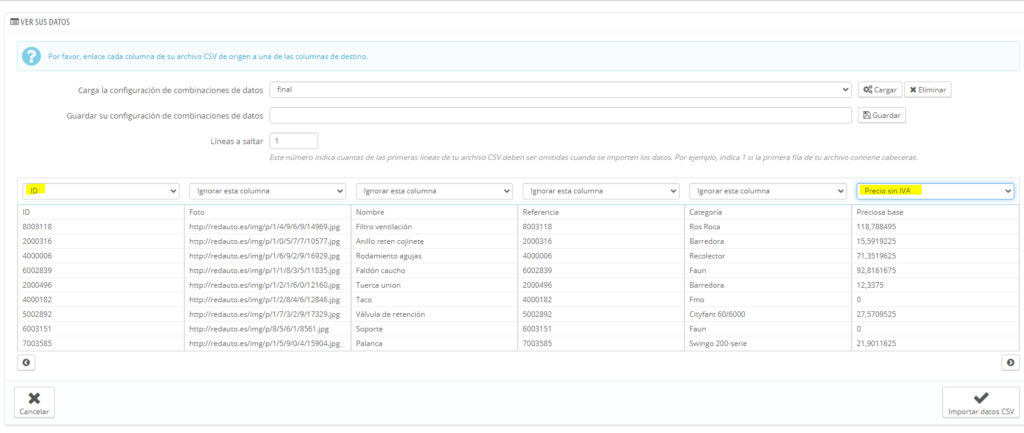
11 – Nos encontraremos con una página en la cual tenemos que decir que tipo de atributo se corresponde con cada columna, en el este caso, como solo queremos actualizar los precios, vamos a ignorar todas las columnas menos el ID y la de precio sin iva, como mostramos a continuación.

13 – Ya solo nos queda darle al botón de importar CSV y esperar a que se termine de importar, es importante tener en cuenta la capacidad del servidor, para asegurarnos una correcta importación, NO RECOMIENDO que el .csv tenga más de 2500 líneas o referencias, en el caso de tener más es mejor dividirlo en varios .csv y repetir el proceso varias veces, de esta forma tendremos más controlados los datos y evitaremos posibles errores.

Y hasta aquí nuestro artículo, esperemos que hayamos aclarado un poco el procedimiento de incrementar el precio de forma masiva en prestashop.

Impactos: 0

How to install PrestaShop on Ubuntu 22.04 Server


Steps to install PrestaShop on Ubuntu 22.04 Server

The steps given here to set up PrestaShop on Ubuntu 22.04 will be the same for Ubuntu 20.04 and 18.04 including Debian 11 server.

What do we need to perform in this tutorial?

⇒ A clean Ubuntu 22.04 server
⇒ A user with sudo access
⇒ Internet connection

1. Update Ubuntu 22.04 Server

The first thing to perform after login into the Ubuntu server to install PrestaShop is to make sure our system is up to date. For that run the given command using APT.

sudo apt update && sudo apt upgrade


2. Install Apache web server

We need a web server to deliver the content generated by Prestashop using PHP. Hence, here we are opting popular Apache web server. To install it on Ubuntu run:

sudo apt install apache2

Enable Apache mod_rewrite module 

sudo a2enmod rewrite
sudo systemctl restart apache2


3. Install the MariaDB database

Well, to store the data we can either use MySQL or its fork MariaDB. Here we are going for MariaDB, those who want to use MySQL can follow this tutorial. Just like Apache, packages to install the MariaDB server are also available to download using the default system repository of Ubuntu. Hence, simply run:

sudo apt install mariadb-server

To ensure the service of the Database is enabled and running, use:

sudo systemctl enable --now mariadb

Now, secure your Database instance:

sudo mysql_secure_installation


Questions                                                                            Answers

Enter current password for root (enter for none): Hit the Enter key
Switch to unix_socket authentication [Y/n]: Type – y and hit the Enter key
Change the root password? [Y/n]:  If you want to change the root password for MariaDB then press Y otherwise – n

Install MariaDB for PRestashop

Remove anonymous users? [Y/n]: Type – y and hit the Enter key
Disallow root login remotely? [Y/n]: Type – y and hit the Enter key
Remove the test database and access it. [Y/n]: Type – y and hit the Enter key
Reload privilege tables now? [Y/n]: Type – y and hit the Enter key

Secure MariaDB installation


4. Create Database for PrestaShop

Now, let’s create a Database to store the data generated by the PrestaShop while installing and later, such as product data, users, and more…

sudo mysql

Note:presta_h2s is the database here and prestauser is the user and the password is the password we used for the database user. Change them as per your choice.

Create Database

create database `presta_h2s`;

Create a User with a password

create user 'prestauser'@'localhost' identified by 'password';

Grant all permissions of Database to User

GRANT ALL PRIVILEGES ON `presta_h2s`.* to `prestauser`@localhost;
exit;


5. Install PHP 7.4 on Ubuntu 22.04

As we know PrestaShop is a PHP-based e-commerce platform, hence, our system should have PHP and required extensions by it to make this platform work properly. The version of PHP while doing this article on Ubuntu 22.04 was PHP8.1. However, the PrestaShop requirement was PHP7.4, hence we have to install that.  But the PHP 7.4 is not available to get using the default system repository, therefore add Ondrej PPA.

sudo apt install software-properties-common
sudo add-apt-repository ppa:ondrej/php -y

Now install PHP 7.4:

sudo apt install php7.4 php7.4-{cli,common,curl,zip,gd,mysql,xml,mbstring,json,intl}

Now, change the memory and upload file limits. 

To find the path of your php.ini file run the below command:

php -i | grep -i php.ini

Now, see the path and use it to edit the php.ini file

In our case it was:

sudo nano /etc/php/7.4/cli/php.ini

install PHP 7.4 on Ubuntu 22.04

Find two lines:

Change memory_limit value to 128M

memory_limit= 128M

SET PHP memroy limit

And also increase the upload size of the file to 16 MB or 32 MB, as per your requirements.

upload_max_filesize = 32M

Upload MAx size PHP prestashop ubuntu 22.04

Save the file using Ctrl+O, hit the Enter key, and then exit the file using Ctrl+X.

Finally, restart the apache

sudo systemctl restart apache2


6. Download PrestaShop on Ubuntu 22.04

Get the latest version of the PrestaShop directly on your system using the command terminal. Here is the Github page link to get the latest release, however, use the given command to download it.

sudo apt install curl
cd /tmp
curl -s https://api.github.com/repos/PrestaShop/PrestaShop/releases/latest | grep "browser_download_url.*zip" | cut -d : -f 2,3 | tr -d \" | wget -qi -


7. Unzip and move Prestashop to the www folder

After downloading the latest version of the PrestaShop, unzip it and move the folder to the webroot directory of the web server. So, that it could be used safely for calling through a web browser.

sudo unzip prestashop_*.zip -d /var/www/prestashop/

Note: If you don’t have an unzip tool, then install it using the command:sudo apt install unzip


8. Change Permission to Apache user

Change the permission of the Prestashop folder to Apache’s www-data user and group, for that the syntax will be:

sudo chown -R www-data: /var/www/prestashop/


9. Configure PrestaShop virtual Host for Apache

In case you are planning to use multiple domains on your Apache webserver then creating a virtual host for Prestashop will be a great idea. This will also let us use our domain for accessing the front-end and backend of the PrestaShop without showing the directory in which we have kept its all files. Therefore create a new Apache configuration file and enable make it.

sudo nano /etc/apache2/sites-available/prestashop.conf

Copy-paste the following lines in the file and save them by using Ctrl+X and type Y and hit the Enter key.

Note: change your_example.com, the domain you want to use for PrestaShop.

<VirtualHost *:80> ServerAdmin admin@your_example.com ServerName your_example.com ServerAlias www.your_example.com DocumentRoot /var/www/prestashop <Directory /var/www/prestashop> Options +FollowSymlinks AllowOverride All Require all granted </Directory> ErrorLog /var/log/apache2/prestashop-error_log CustomLog /var/log/apache2/prestashop-access_log common </VirtualHost>

Enable the Prestashop Apache configuration and restart the web server.

sudo a2ensite prestashop.conf

Disable the default Apache page

sudo a2dissite 000-default.conf
sudo systemctl restart apache2


10. Access Ubuntu 22.04 running Ecommerce Store

Everything is ready and it’s time to access our Ubuntu 22.04 or 20.04 installed PrestaShop eCommerce store for further settings. Open the browser on your local system and type the Ip address or domain.com pointing to the store.

http://ip-address

http://your_domain.com


Impactos: 0

¿Cómo arreglar Apache2 no ejecutando archivos PHP?

Paso 1: Modificar el archivo .conf
Lo primero que debemos hacer es modificar el archivo de configuración principal de Apache2. Para hacer esto, abre una ventana de la terminal y emite el comando:

sudo nano /etc/apache2/apache2.conf

Con apache2.conf abierto, todo lo que tiene que hacer es agregar la siguiente linea al final del archivo:

<FilesMatch \.php$>
SetHandler application/x-httpd-php
</FilesMatch>

Guarda y cierra apache2.conf.

Paso 2: Habilitar / deshabilitar módulos
Para que PHP funcione correctamente, debes deshabilitar el módulo mpm_event y habilitar los módulos mpm_prefork y php7. Para hacer esto, regresa a la ventana de la terminal y escribe el comando:

sudo a2dismod mpm_event && sudo a2enmod mpm_prefork && sudo a2enmod php7.0

Paso 3: Reiniciar Apache 2
Está todo listo para reiniciar Apache2. Debido a que hemos deshabilitado / habilitado los módulos, tenemos que reiniciar por completo Apache2 (en lugar de volver a cargar los archivos de configuración). Para reiniciar Apache2, regresa a la ventana de la terminal y emite el comando:

sudo service apache2 restart

Ahora deberías poder apuntar un navegador a un archivo PHP y verlo ejecutarse correctamente, en lugar de guardarlo en su disco local o mostrar código en su navegador.

fuente : https://support.hostinger.es/es/articles/3963793-como-arreglar-apache2-no-ejecutando-archivos-php


Impactos: 0

How To Install OVFTool on Ubuntu 20.04 with Python3

How To Install OVFTool on Ubuntu 20.04 with Python3

Since I use terraform to clone and provision VMs on ESXi, I need to use VMWare’s ovftool. However, I’ve been having errors lately. The OVFTool wants to install using python2, and I keep getting syntax errors. Seems like it’s using my Python3 install and I can’t get it to install.

If we cannot install the ovftool via the conventional way, we have to find a detour or a workaround to get there. For this particular issue with the failed installation on Ubuntu 20.04, this means extracting the ovftool files from the installation .bundle, copying them to /usr/bin/ and configure an alias for the ovftool executable.

Execute ovftool without installing it

This is how it works step-by-step:

Extract the files and change into directory ovftool (you can name the extracted directory as you want):

sudo ./VMware-ovftool-4.4.1-16812187-lin.x86_64.bundle --extract ovftool && cd ovftool
ls -rtl
total 16K drwxr-xr-x 4 root   root         4,0K Mär  9 14:07 . drwxr-xr-x 5 rguske domain^users 4,0K Mär  9 14:07 .. drwxr-xr-x 9 root   root         4,0K Mär  9 14:07 vmware-installer drwxr-xr-x 6 root   root         4,0K Mär  9 14:07 vmware-ovftool Here’s what’s in it:
$ tree -L 2 . ├── vmware-installer │   ├── artwork │   ├── bin │   ├── bootstrap │   ├── lib │   ├── manifest.xml │   ├── python │   ├── sopython │   ├── vmis │   ├── vmis-launcher │   ├── vmware-installer │   ├── vmware-installer.py │   ├── vmware-uninstall │   └── vmware-uninstall-downgrade └── vmware-ovftool     ├── certs     ├── env     ├── icudt44l.dat     ├── libcares.so.2     ├── libcrypto.so.1.0.2     ├── libcurl.so.4     ├── libexpat.so     ├── libgcc_s.so.1     ├── libgoogleurl.so.59     ├── libicudata.so.60     ├── libicuuc.so.60     ├── libssl.so.1.0.2     ├── libssoclient.so     ├── libstdc++.so.6     ├── libvim-types.so     ├── libvmacore.so     ├── libvmomi.so     ├── libxerces-c-3.2.so     ├── libz.so.1     ├── manifest.xml     ├── open_source_licenses.txt     ├── ovftool     ├── ovftool.bin     ├── README.txt     ├── schemas     ├── vmware.eula     └── vmware-eula.rtf
11 directories, 31 files

Move the vmware-ovftool directory to /usr/bin/:

sudo mv vmware-ovftool /usr/bin/

Make the two files ovftool as well as ovftool.bin executable:

sudo chmod +x /usr/bin/vmware-ovftool/ovftool.bin sudo chmod +x /usr/bin/vmware-ovftool/ovftool

Configure an alias for your used shell to execute it as usual:

alias ovftool=/usr/bin/vmware-ovftool/ovftool
tags : Linux, VMware


Impactos: 0

The update cannot be installed because we will be unable to copy some files. This is usually due to inconsistent file permissions.: wp-admin/includes/update-core.php

The update cannot be installed because we will be unable to copy some files. This is usually due to inconsistent file permissions.: wp-admin/includes/update-core.php

  • find /var/www/example.com -type d -exec chmod 755 ‘{}’ \;
  • find /var/www/example.com -type f -exec chmod 644 ‘{}’ \;
  • chown -R  www-data:www-data   /var/www/example.com;


Impactos: 0

Cómo configurar IMAP en clientes de correo de GMAIL o GOOGLE APPS


Cómo configurar IMAP en clientes de correo de GMAIL o GOOGLE APPS

Instrucciones para la configuración de correo entrante con IMAP de Gmail (Google, G.Suite):

  • Servidor de correo entrante (IMAP) – requiere SSL
    • imap.gmail.com
    • Puerto: 993
    • Requiere SSL: Sí
    • Modo de identificación: En Thunderbird, ahora podemos seleccionar como tipo de contraseña OAuth2. Si usamos contraseña normal, tenemos que tener Activada “aplicaciones menos seguras” en la configuración de Google.
  • Servidor de correo saliente (SMTP) – requiere TLS
    • smtp.gmail.com
    • Puerto: 465 o 587
    • Requiere SSL: Sí
    • Requiere autenticación: Sí
    • Utilizar la misma configuración que mi servidor de correo de entrada:
  • Nombre completo o Su nombre: [tu nombre]
  • Nombre de cuenta o Nombre de usuario: tu dirección completa de Gmail (nombredeusuario@gmail.com). Si eres usuario de Google Apps, escribe nombredeusuario@tudominio.com
  • Dirección de correo electrónico: tu dirección completa de Gmail (nombredeusuario@gmail.com). Si eres usuario de Google Apps, escribe nombredeusuario@tudominio.com.
  • Contraseña: tu contraseña de Gmail.


Impactos: 0

DisklessUbuntuHowto


What is diskless booting?

Diskless booting is using a remote system or systems to store the kernel and the filesystem that will be used on other computer(s).

Why do it?

Imagine my case I admin about 25 public workstations for a local library, if they want something changed across the board I can either go sit at each PC and spend X minutes on it, adding up to who knows how many hours, or I can simply make the change at any one of the 25 systems and have it affect every system equally. The same goes for updates and many other operations. It really eases support issues.

How is this different than ThinClientHowto?

Thin clients use some of the same principles but they also connect to a remote X session, which means everything runs on the remote server – all applications will consume the servers resources, such as RAM and CPU cycles.

Diskless Booting simply uses the remote server for storage and still runs all applications on the local client station. This works better if you have full powered PC's to work with, and are working with a large number of clients that would require too much CPU and RAM to run all their applications on one server.

It is different enough to have multiple machines mounting the same root filesystem as opposed to simply being a remote monitor and keyboard to warrant a separate how-to I think.

Oliver Grawert says :- you could have achieved this easier by following the thin client howto, remove the ltsp-client package from the chroot and install ubuntu-desktop (or whatever desktop you want) there, would save you a lot of configuration work 😉

How does it work?

There are a lot of parallels to ThinClientHowto, diskless booting requires a DHCP server which a bootable PXE network card will query to get its configuration and location of the file to tftp from the server, after booting the PXE image the client will tftp and boot the kernel image(with args specified in the pxe config), those args will tell the kernel how to configure itself, and the path to mount the NFS share where its / directory is located.

Requirements

  • An Ubuntu system with (preferably) nfs-kernel-server and tftpd server (the server)
  • At least one PXE-bootable system (the client)
  • It helps to have the client set up in its final configuration before you start
  • Enough disk space on the server to hold the client filesystem
  • A fast network connection between the client and the server
  • A DHCP server which is capable of supporting PXE clients, or a separate network segment where you can run a dedicated DHCP server
  • A good understanding of Linux

Getting Started

Naming Conventions

Client: A diskless system that you wish to boot via a network connection
Server: An always-on system which will provide the neccesary files to allow the client to boot over the network

Set up your Server

  1. Install the required packages
    1. Ubuntu 14.04
      • sudo apt-get install isc-dhcp-server tftpd-hpa syslinux nfs-kernel-server initramfs-tools

    2. Ubuntu 14.10 and after
      • sudo apt-get install isc-dhcp-server tftpd-hpa syslinux pxelinux nfs-kernel-server initramfs-tools

  2. Configure your DHCP server

    You need to set up the DHCP server to offer /tftpboot/pxelinux.0 as a boot file as a minimum. You also assign a fixed IP to the machine you want to boot with PXE (the client). A range of other options are also available but are beyond the scope of this article. Your /etc/dhcp/dhcpd.conf might look like this assuming your subnet is 192.168.2.0

    allow booting; allow bootp;  subnet 192.168.2.0 netmask 255.255.255.0 {   range 192.168.2.xxx 192.168.2.xxx;   option broadcast-address 192.168.2.255;   option routers 192.168.2.xxx;   option domain-name-servers 192.168.2.xxx;    filename "/pxelinux.0"; }  # force the client to this ip for pxe. # This is only necessary assuming you want to send different images to different computers. host pxe_client {   hardware ethernet xx:xx:xx:xx:xx:xx;   fixed-address 192.168.2.xxx; }

    NOTE 1: You will need to replace the 'xx:xx:xx:xx:xx:xx' and the '192.168.2.xxx' with your own values
    NOTE 2: the filename is a relative path to the root of the tftp server.

    Restart DHCP Server using the command

    sudo service isc-dhcp-server restart

  3. Configure the TFTP Server

    We need to set tftp-hpa to run in daemon mode and to use /tftpboot as its root directory.
    Here is an example /etc/default/tftpd-hpa file

    #Defaults for tftpd-hpa RUN_DAEMON="yes" OPTIONS="-l -s /tftpboot"

  4. Configure your tftp root directory
    1. Create directories
      sudo mkdir -p /tftpboot/pxelinux.cfg

    2. Copy across bootfile
      1. Ubuntu 14.04:
        • sudo cp /usr/lib/syslinux/pxelinux.0 /tftpboot

      2. Ubuntu 14.10 and after:
        • sudo cp /usr/lib/PXELINUX/pxelinux.0 /tftpboot sudo mkdir -p /tftpboot/boot sudo cp -r /usr/lib/syslinux/modules/bios /tftpboot/boot/isolinux

    3. Create default configuration file /tftpboot/pxelinux.cfg/default
      LABEL linux KERNEL vmlinuz-2.6.15-23-686 APPEND root=/dev/nfs initrd=initrd.img-2.6.15-23-686 nfsroot=192.168.2.2:/nfsroot ip=dhcp rw

      NOTE1: your nfs server IP address, kernel name, and initrd name will likely be different. If you have a preconfigured system the names should be the names of the kernel and initrd (see below) on the client system
      NOTE2: to find the vmlinuz type uname -r
      NOTE3: There are more options available such as MAC or IP identification for multiple config files see syslinux/pxelinux documentation for help.
      NOTE4: Newer distributions might require that you append “,rw” to the end of the “nfsroot=” specification, to prevent a race in the Upstart version of the statd and portmap scripts.

    4. Set permissions
      sudo chmod -R 777 /tftpboot

      NOTE:If the files do not have the correct permissions you will receive a “File Not Found” or “Permission Denied” error.

    5. Start the tftp-hpa service:
      sudo /etc/init.d/tftpd-hpa start

  5. Configure OS root
    1. Create a directory to hold the OS files for the client
      sudo mkdir /nfsroot

    2. configure your /etc/exports to export your /nfsroot
      /nfsroot             192.168.2.xxx(rw,no_root_squash,async,insecure)

      NOTE: The '192.168.2.xxx' should be replaced with either the client IP or hostname for single installations, or wildcards to match the set of servers you are using.

      Note: In versions prior to Ubuntu 11.04 the option ',insecure' is not required after async.

    3. sync your exports
      sudo exportfs -rv

Creating your NFS installation

There are a few ways you can go about this:

  • debbootstrap (as outlined at Installation/OnNFSDrive)

  • copying the install from your server
  • install [lk]ubuntu on the client from CD, after you've got your system installed and working on the network mount the /nfsroot and copy everything from your working system to it.

This tutorial will focus on the last option. The commands in this section should be carried out on the client machine unless it is explicitly noted otherwise. You should ensure that the following package is installed on the client nfs-common

  1. Copy current kernel version to your home directory.
    • uname -r will print your kernel version, and ~ is shorthand for your home directory.

    sudo cp /boot/vmlinuz-`uname -r` ~

  2. Create an initrd.img file
    1. Change the BOOT flag to nfs in /etc/initramfs-tools/initramfs.conf

      # # BOOT: [ local | nfs ] # # local - Boot off of local media (harddrive, USB stick). # # nfs - Boot using an NFS drive as the root of the drive. #  BOOT=nfs

    2. Change the MODULES flag to netboot in /etc/initramfs-tools/initramfs.conf

      # # MODULES: [ most | netboot | dep | list ] # # most - Add all framebuffer, acpi, filesystem, and harddrive drivers. # # dep - Try and guess which modules to load. # # netboot - Add the base modules, network modules, but skip block devices. # # list - Only include modules from the 'additional modules' list #  MODULES=netboot

      NOTE: if you have anything in /etc/initramfs-tools/conf.d/driver-policy, this line will be ignored.

    3. Check which modules you will need for your network adapters and put their names into /etc/initramfs-tools/modules (for example forcedeth , r8169 or tulip)
    4. Run mkinitramfs
      mkinitramfs -o ~/initrd.img-`uname -r`

  3. Copy OS files to the server
    mount -t nfs -onolock 192.168.1.2:/nfsroot /mnt cp -ax /. /mnt/. cp -ax /dev/. /mnt/dev/.

    NOTE: If the client source installation you copied the files from should remain bootable and usable from local hard disk, restore the former BOOT=local and MODULES=most options you changed in /etc/initramfs-tools/initramfs.conf. Otherwise, the first time you update the kernel image on the originating installation, the initram will be built for network boot, giving you “can't open /tmp/net-eth0.conf” and “kernel panic”. Skip this step if you no longer need the source client installation.

  4. Copy kernel and initrd to tftp root.

    Run these commands ON THE SERVER

    sudo cp ~/vmlinuz-`uname -r` /tftpboot/ sudo cp ~/initrd.img-`uname -r` /tftpboot/

  5. Modify /nfsroot/etc/network/interfaces

    When booting over the network, the client will already have carried out a DHCP discovery before the OS is reached. For this reason you should ensure the OS does not try to reconfigure the interface later.
    You should set your network interface to be “manual” not “auto” or “dhcp”. Below is an example file.

    # This file describes the network interfaces available on your system # and how to activate them. For more information, see interfaces(5).  # The loopback network interface auto lo iface lo inet loopback  # The primary network interface, commented out for NFS root #auto eth0 #iface eth0 inet dhcp iface eth0 inet manual

    NOTE: For Ubuntu 7.04 (Feisty Fawn) it seems the /etc/network/interfaces needs a little tweak, in order *not* to have the NetworkManager fiddle with the interface since it's already configured (see also bug #111227 : “NFS-root support indirectly broken in Feisty”)
    NOTE: If you use dnsmasq for your boot client (instead of dhcp), you will need to provide nameserver(s) information in /etc/resolvconf/resolv.conf.d/base. For instance,
    nameserver 192.168.0.xxx (You will need to replace the '192.168.0.xxx' with your own values.)

  6. Configure fstab

    /nfsroot/etc/fstab contains the information the client will use to mount file systems on boot, edit it to ensure it looks something like this ('note no swap')

    # /etc/fstab: static file system information. # # <file system> <mount point>   <type>  <options>       <dump>  <pass> proc            /proc           proc    defaults        0       0 /dev/nfs       /               nfs    defaults          1       1 none            /tmp            tmpfs   defaults        0       0 none            /var/run        tmpfs   defaults        0       0 none            /var/lock       tmpfs   defaults        0       0 none            /var/tmp        tmpfs   defaults        0       0 /dev/hdc        /media/cdrom0   udf,iso9660 user,noauto 0       0

    NOTE: if you have entries for other tmpfs that's fine to leave them in there

  7. Disable Grub update

    Since diskless systems don't need grub to boot, disable update scripts to prevent glitches during further software updates. Comment out exec update-grub in /etc/kernel/postinst.d/zz-update-grub


Impactos: 0

How to Boot Ubuntu 20.04 into Text / Command Console


How to Boot Ubuntu 20.04 into Text / Command Console

Need to do some work in the black & white command line console? You can press Ctrl+Alt+F3 on keyboard to switch from the current session to tty3 text console, and switch back via Ctrl+Alt+F2.

From the startup grub boot-loader menu entry, you may select the Advanced Options > recovery mode > Drop to root shell prompt to get into text mode. However you need to run command mount -o rw,remount / to get file system write permission.

If you want to make Ubuntu automatically boot into the text mode, configure grub settings by doing following steps one by one:

1. Open terminal and run command to backup the configuration file:

sudo cp -n /etc/default/grub /etc/default/grub.backup

2. Edit the configuration file via command:

sudo gedit /etc/default/grub

When the file opens, do:

  • disable GRUB_CMDLINE_LINUX_DEFAULT="quiet splash" by adding # at the beginning.
  • set GRUB_CMDLINE_LINUX="" to GRUB_CMDLINE_LINUX="text"
  • remove # from the line GRUB_TERMINAL="console" to disable graphical terminal.

3. Save the file and apply changes by running command:

sudo update-grub

4. One more command is required as Ubuntu now uses systemd:

sudo systemctl set-default multi-user.target

How to Restore:

To restore changes, simply move back the backup file via command:

sudo mv /etc/default/grub.backup /etc/default/grub

And run sudo update-grub to apply change.

Also change the setting back in systemd via command:

sudo systemctl set-default graphical.target

Impactos: 0

Cómo instalar la CPU XMR STAK para Monero Mining en Ubuntu 16.04

Cómo instalar la CPU XMR STAK para Monero Mining en Ubuntu 16.04

¡Monero Mining es para todos!

A diferencia de Etherum, puedes minar Monero con casi cualquier cosa, incluso con la CPU de tu portátil antiguo. Eso no producirá muchas ganancias, pero es una posibilidad. Además de eso, la minería de GPU no ofrece un aumento sustancial en el poder de minería como en Ethereum. Aquí, una GPU dedicada puede ofrecer solo 2 a 3 veces más hashrate que una nueva CPU, en lugar de 10 a 20 veces la de Ethereum. Esto significa que es mejor configurar todas sus computadoras portátiles antiguas en la mía que comprar una nueva GPU, a menos que, por supuesto, tenga la intención de configurar una granja completa.

También puedes minar con una CPU y una GPU al mismo tiempo. Tenga en cuenta que esto probablemente tenga un mayor consumo de energía, y debe calcular si lo que está haciendo es rentable. Veamos cómo minar usando solo una CPU.

Cómo instalar XMR-STAK-CPU – Herramienta de minería Monero

Recomiendo usar xmr-stak-cpu, una solución de código abierto muy rápida y rentable. En primer lugar, tendremos que instalar dependencias del programa. También tendremos que compilarlo, por lo que también necesitamos software para eso. Correr:

sudo apt install libmicrohttpd-dev libssl-dev cmake build-essential libhwloc-dev

Luego, descarga el minero:

wget https://github.com/fireice-uk/xmr-stak-cpu/archive/master.zip

Descomprímelo:

unzip master.zip

Ingrese al nuevo directorio:

cd xmr-stak-cpu-master

Ejecute CMake:

cmake .

Una vez que hayas terminado, instala el minero:

make install

Debería crear una carpeta “bin”. Ingrese a la carpeta:

cd bin

Cómo configurar

Y edite el archivo de configuración. Por lo general, todo lo que necesita hacer es especificar la dirección de su grupo, la dirección de su billetera y la “contraseña del grupo”, que para el grupo que estamos usando es solo el nombre de la máquina y el correo electrónico. Aquí hay un ejemplo.

nano config.txt
„pool_address” : „pool.supportxmr.com:3333”, „wallet_address” : „yourmonerowalletaddresshere”, „pool_password” : „worker:name@email.com”,

Una vez que establezca el archivo de configuración, ejecute

./xmr-stak-cpu

¡Y su máquina comenzará a minar con su CPU!

Impactos: 0

¿Cómo evitar que un cron job me envíe un email cada vez que se ejecuta?

¿Cómo evitar que un cron job me envíe un email cada vez que se ejecuta?


1. Redirigir la salida

0   */2 *   *   *   /bin/sh /ruta/mi-script.sh >/dev/null 2>&1 

Esto lo que hace es redirigir la salida estándar y la salida de error al clásico colector de basura de unix /dev/null. Podrías eventualmente dejar la salida de error para que pase por el mail y desactivar solo la estándar:

0   */2 *   *   *   /bin/sh /ruta/mi-script.sh >/dev/null 

2. Quitar el MAILTO

Si tienes acceso a editar el archivo /etc/crontab puedes editar la variable MAILTO dejándola en blanco MAILTO=""

3. Configurar el demonio del cron para que la salida vaya a un log

Si puedes editar /etc/sysconfig/crond, podrías agregar el parámetro -s para redirigir la salida al log del sistema y -m off para deshabilitar el envío de mails

Ten en cuenta que las opciones 2 y 3 requieren reiniciar el demonio del cron.

Referencia: https://www.putorius.net/2015/03/stop-cron-daemon-from-sending-email-for.html

Impactos: 0