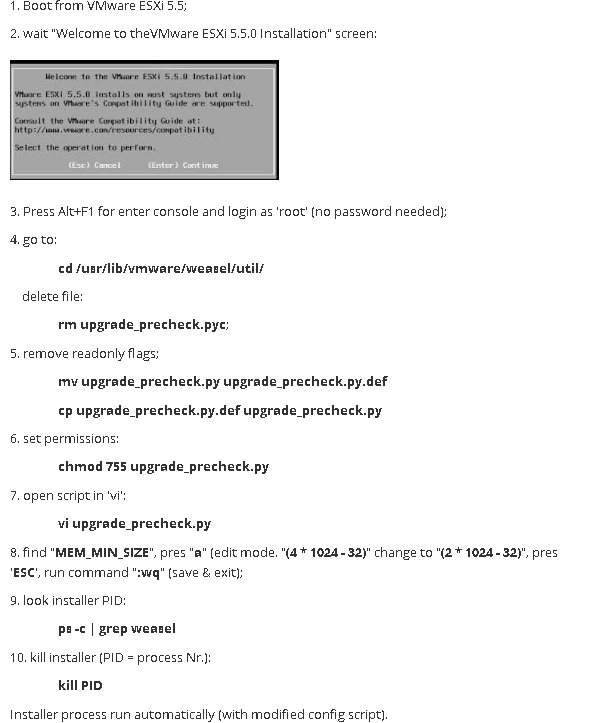
Macro Word exportar combinación PDF individuales

Sub GUARDAR_HOJAS_DOSTIN()
'
' Macro Dustiniana xD
' www.DostinHurtado.com
' Cursos gratis 😀

Dim num_paginas As Integer
Dim num_doc As Integer
Dim pag_inicial As Integer
Dim pagina_final As Integer
Dim URL As String
Dim nombres As String

num_paginas = InputBox(“Ingrese el número de páginas por documento”)
num_doc = InputBox(“¿Cuantos documentos desea generar?”)
URL = InputBox(“¿Donde desea crear los documentos?”)
nombres = InputBox(“¿Que nombre tendrán los Documentos?”)
pag_inicial = 1
pagina_final = num_paginas

For i = 1 To num_doc
    ActiveDocument.ExportAsFixedFormat OutputFileName:= _
        URL & “\” & nombres & i & “.pdf”, ExportFormat:= _
        wdExportFormatPDF, OpenAfterExport:=False, OptimizeFor:= _
        wdExportOptimizeForPrint, Range:=wdExportFromTo, From:=pag_inicial, To:=pagina_final, Item:= _
        wdExportDocumentContent, IncludeDocProps:=True, KeepIRM:=True, _
        CreateBookmarks:=wdExportCreateNoBookmarks, DocStructureTags:=True, _
        BitmapMissingFonts:=True, UseISO19005_1:=False
    ChangeFileOpenDirectory URL
   
pag_inicial = pagina_final + 1
pagina_final = pagina_final + num_paginas
Next i
End Sub

Referencia: 
www.DostinHurtado.com

Impactos: 0

How can I create a child theme in Prestashop

image.png

First of all, you need to have an installed theme on your store(root/themes folder) that will be used as a parent for your child theme. Create a new folder in /themes folder( For example: childtheme) copy below files from parent theme folder to child theme folder

 ├── config  │   └── theme.yml  └── preview.png 

open theme.yml file of child theme and specify which theme should be used as a parent.

parent: classic name: childtheme display_name: My first child Theme version: 1.0.0 assets:   use_parent_assets: true 

Now go to back office where you can see a new child theme will appear and you are all set.

Impactos: 0

Módulo para borrar cache de forma automática.

image.png
Hoy te mostraré cómo borrar el caché mediante programación en PrestaShop. Por ejemplo, puede realizar una tarea CRON que ejecutará este pequeño script PHP una o más veces al día, según sus necesidades.
1. Create PHP file in your store root (main) directory and name it as you wish – in this example it’ll be cache_clear.php
2. Open this file and paste

include('./config/config.inc.php');

$token = Tools::getValue('token');

if($token == “vBnmmP3218”) {
    Tools::clearSmartyCache();
    Tools::clearXMLCache();
    Media::clearCache();
    Tools::generateIndex();
    echo “Cache clear ended successfully.”;
} else {
    echo “Wrong security token – cache clear failed.”;
}
3. Change the string vBnmmP3218 to your random one (stronger is more secure).
4. Save the file.
5. Add script URL to your CRON task manager or execute it directly via your browser in format: http://{your_store_url}/cache_clear.php?token=vBnmmP3218

For example: http://example.com/cache_clear.php?token=vBnmmP3218

Impactos: 0

¿Cómo evitar que un cron job me envíe un email cada vez que se ejecuta?

¿Cómo evitar que un cron job me envíe un email cada vez que se ejecuta?


1. Redirigir la salida

0   */2 *   *   *   /bin/sh /ruta/mi-script.sh >/dev/null 2>&1 

Esto lo que hace es redirigir la salida estándar y la salida de error al clásico colector de basura de unix /dev/null. Podrías eventualmente dejar la salida de error para que pase por el mail y desactivar solo la estándar:

0   */2 *   *   *   /bin/sh /ruta/mi-script.sh >/dev/null 

2. Quitar el MAILTO

Si tienes acceso a editar el archivo /etc/crontab puedes editar la variable MAILTO dejándola en blanco MAILTO=""

3. Configurar el demonio del cron para que la salida vaya a un log

Si puedes editar /etc/sysconfig/crond, podrías agregar el parámetro -s para redirigir la salida al log del sistema y -m off para deshabilitar el envío de mails

Ten en cuenta que las opciones 2 y 3 requieren reiniciar el demonio del cron.

Referencia: https://www.putorius.net/2015/03/stop-cron-daemon-from-sending-email-for.html

Impactos: 0

Habilite VNC en implementaciones de VMware

image.png

This article outlines the steps needed to enable VNC on VMware, so that the VNC console can be used within the Platform9 UI.
Step 1 – Changes Needed on the ESXi Hosts Housing the Virtual Machines

SSH to the ESXi host (not vCenter). We need to open the VNC ports on the ESXi firewall. These steps need to be performed on all the ESX hosts that are part of the clusters authorized with Platform9 controller. An automated script for doing same is coming soon.

chmod 644 /etc/vmware/firewall/service.xml
chmod +t /etc/vmware/firewall/service.xml
vi /etc/vmware/firewall/service.xml

Create a new service block before the end of ConfigRoot tag.

<service id=”new unique id within this file”>
<id>VNC</id>
<rule id=”0000″>
<direction>inbound</direction>
<protocol>tcp</protocol>
<porttype>dst</porttype>
<port>
<begin>5900</begin>
<end>6199</end>
</port>
</rule>
</service>

Step 2 – Add Firewall Rules to the ESXi Firewall and Verify that Ports Have Been Opened

On the ESXi host, execute the following commands

esxcli network firewall refresh
esxcli network firewall ruleset set –ruleset-id VNC –enabled true

Verify that the firewall rules were applied and the ports are open by executing the following commands

esxcli network firewall ruleset list
# You should see a rule labelled VNC in the output
esxcli network firewall ruleset rule list
# You should see the details of VNC rule i.e. port range, protocol, direction, etc.

Step 3 – Enable VNC for Existing Virtual Machines (Optional)

To enable VNC console for existing VMs, power off the VM and use one of the following:

Using vSphere Web Client
Click on “edit settings”-> Select the “VM Options” tab->Expand the “Advanced” section-> click on “Edit configuration” and add the settings mentioned at the end of this step
Directly on ESXi Host
Edit the *.vmx file of the corresponding VM and the lines mentioned here.

RemoteDisplay.vnc.enabled = “TRUE”
RemoteDisplay.vnc.port = “<port>” # Port between 5900 and 6199

IMPORTANT NOTES –
1. The key point in the step 3 is to make sure that the port number that you are adding does not collide with any other VM. One way to verify that is to SSH into the ESXi host and run grep on all the *.vmx files and choose a port that is not present in the output

grep “vnc.port” */*/*/*/*.vmx

2. For VNC console to work, the appliance, the ESX host, and the browser where the VNC is being accessed need to have IP connectivity to each other.

Fuente:
https://docs.platform9.com/support/enable-vnc-on-vmware-deployments/

#vmware, #Linux


Impactos: 0

Omitir la verificación de memoria en un VMware ESXi 5

image.png
Omitir la verificación de memoria en un VMware ESXi 5
 
Pasos a seguir:

Boot the system from USB Stick with ESXi installer on it.
Once the installer welcome screen shows up, press ALT+F1
Login as “root”, no password.
cd /usr/lib/vmware/weasel/util
Delete upgrade_precheck .pyc (compiled version)
Move precheck.py to precheck.py.old
cp upgrade_precheck.py.old upgrade_precheck.py
chmod 666 upgrade_precheck.py
vi upgrade_precheck.py
Type “/MEM_MIN” and press ENTER
Press “i” for insert
Edit the line to read “MEM_MIN_SIZE= (1*1024–32)”
Press ESC and then type “:w” and ENTER
Press ESC and then type “:q!” and ENTER
ps -c | grep weasel
Note the process id for “python”
kill –9 /<process_id/>
This put me back at the main screen, but you can jump back pressing ALT+F2 if necessary
Continue the install process

 Referencia:
image.png

Impactos: 0

Montar y desmontar unidades USB

image.png
Utilidad para montar y desmontar unidades USB

Para montar unidad USB

C:\Windows\System32\mountvol.exe E:\ \\?\Volume{c5f4a6e7-86be-11e6-a604-806e6f6e6963}\

Para desmontar unidad USB

C:\Windows\System32\mountvol.exe E:\ /p

Para desconectar puerto USB

C:\Windows\System32\rundll32.exe shell32.dll,Control_RunDLL hotplug.dll


Impactos: 0

Copias de seguridad de MariaDB automatizadas


image.png

Primero instalar el cliente de mariadb


apt-get install -y mariadb-client

Crear el siguiente script y hacerlo ejecutable

#!/bin/bash
pcds=/var/opt/mariadb
cds=$pcds/copia_de_seguridad_$(date +%Y%m%dT%H.%M.%S).sql
mysqldump –all-databases –lock-tables > $cds
if [ $? -eq 0 ]
then
gzip $cds
limite=$(date +%Y%m%dT%H.%M.%S -d “-7 days”)
for i in $pcds/*.sql.gz
do
if [[ ${i:36:17} < $limite ]] && [[ -e $i ]]
then
rm $i
fi
done
else
if [[ -e $cds ]]
then
rm $cds
fi
source /root/.telegram_keysURL=https://api.telegram.org/bot$TOKEN/sendMessage
message=”No se ha podido hacer la copia de seguridad”
curl -s -X POST $URL -d chat_id=$CHANNEL -d text=”$message” >/dev/null 2>&1
fi

y en el crontab crear las siguientes líneas:

30 23 * * * /mnt/mydatabasebackupscript.sh
0 4 * * * find /var/log/ -name *.gz -mtime +7 -exec rm {} \;
0 4 * * * find /mnt/copia/ -name *.gz -mtime +7 -exec rm {} \;


Impactos: 0

Google Chrome recuerde la ubicación

Google Chrome recuerde la ubicación

Usted podría utilizar la siguiente Chrome parámetros de línea de comandos (actualización de Chrome en el destino del acceso directo):

  • para especificar la ventana inicial de la posición: --window-position=x,y y
  • para especificar el tamaño de ventana inicial: --window-size=w,h, o
  • para iniciar el navegador maximizado, independientemente de los ajustes previos: --start-maximized

Así que el objetivo de un Chrome de acceso rápido para iniciar Chrome ventana maximizada podría ser como sigue:

"C:\Program Files (x86)\Google\Chrome\Application\chrome.exe" --start-maximized

Fuente: https://www.enmimaquinafunciona.com/pregunta/46639/evitar-que-google-chrome-de-recordar-la-posicion-de-la-ventana-en-cerrar

Impactos: 0

Backup Linux -> Windows Rsync

Linux

Backup Linux -> Windows Rsync

Para hacer backup de una carpeta de Linux en una de un Windows sería (LINUX –> WINDOWS):

1º.- Crear un usuario ‘backup’ (por ejemplo) con contraseña ‘123456’ (solo es un ejemplo…) en el equipo con WINDOWS.
2º.- Crea una carpeta ‘copia’, comparte esa carpeta desde el equipo WINDOWS y dale solo permiso de acceso al usuario ‘backup’.
3º.- Desde el equipo origen, el LINUX, tenemos que realizar tres pasos que podemos automatizar en un script, que serian:
a.- Monta el recurso compartido en windows en algún directorio de linux.
$mount -t cifs //ip.del.equipo.windows/copia /media/ejemplo -o username=backup,password=123456
b.- Realiza la sincronización vía rsync.

$rsync -rltDvu –modify-window=1 –progress –delete /directorio/origen/copia /media/ejemplo

c.- Desmonta el recurso compartido.
$umount /media/ejemplo

Si esto lo ponemos en un script y lo ejecutamos mediante una tarea de cron cada hora, tendremos un “espejo” de nuestros datos desde el equipo LINUX hacia el equipo WINDOWS que nos servirá como una primera medida en cuanto a copias de seguridad. Editar /etc/crontab como root, y añadir las líneas:

# Copia de seguridad con rsync. Una vez cada hora, a horas en punto.
00 * * * * root bash /nuestro_script.sh

*La primera sincronización es una copia completa, por lo que dependiendo de los datos que tengas tardará bastante. Las sincronizaciones cada hora suelen ser bastante rápidas, en una hora no se suelen cambiar, crear o borrar muchas cosas. Yo lo tengo funcionando desde hace algún tiempo en un entorno de producción para backups desde un servidor samba en Debian hacia un 2008 server, y cero problemas.

Utilizar la siguiente notación: supongamos que queremos sincronizar 2 directorios ubicados en el disco C: y en el disco D:

rsync --update --recursive --progress /cygdrive/c/directorio_origen/* /cygdrive/d/directorio_destino/

Enlace externo : Otras Webs

Impactos: 0